A Concise Guide to Using Pipenv
Python has multiple package managers to choose from, each having their own pros and cons. In this tutorial, we will explore pipenv. This option is especially powerful as it combines the use of pip and virtualenv.
Installing
For Mac users, installing pipenv can simply be done using Homebrew:
brew install pipenv
Alternatively, the installation can be done using pip:
$ pip install --user pipenv
Setting Up a New Project
Now that pipenv is installed, it’s time to use it in a project. Create (or navigate) to a new folder for your project. Using the CLI, you can create a new virtual environment by running only pipenv command and passing in a Python version:
pipenv --python 3.11
In your project’s root directory, a new Pipfile should have been generated with contents similar to the following:
[[source]]
url = "https://pypi.org/simple"
verify_ssl = true
name = "pypi"

[packages]

[dev-packages]

[requires]
python_version = "3.11"
python_full_version = "3.11.5"
Installing a Package
Obviously, we don’t have any packages installed yet. We’ll begin by installing Flask using the following CLI command:
pipenv install Flask
You’ll notice that in the Pipfile, the following package has been added:
Pipfile
...
[packages]
flask = "*"
...
The asterisk in the line that specifies flask = "*" refers to pulling the latest version. By adding a dependency, a separate Pipfile.lock file has bee created. At the time of writing, Flask 3.0.0 was the latest version which is what got installed.
The important thing to remember is that since this lock file has been created, version 3.0.0 will be used unless we deliberately update the version. If however, a new version comes out and we delete the lock file, we can install a newer version simply by running pipenv install.
Managing Sub-Dependencies
Many packages have a number of dependencies they depend on. pipenv has a graph command that displays this in a readable format. This is great for tracking down issues like conflicts from different version requirements.
Running pipenv graph
brett$ pipenv graph
flask==3.0.0
  - blinker [required: >=1.6.2, installed: 1.6.2]
  - click [required: >=8.1.3, installed: 8.1.7]
  - itsdangerous [required: >=2.1.2, installed: 2.1.2]
  - Jinja2 [required: >=3.1.2, installed: 3.1.2]
    - MarkupSafe [required: >=2.0, installed: 2.1.3]
  - Werkzeug [required: >=3.0.0, installed: 3.0.0]
    - MarkupSafe [required: >=2.1.1, installed: 2.1.3]
Notice that Jinja2 and Werkzeug both have MarkupSafe as a dependency with slightly different version requirements. This can eventually get complicated with many installed packages, especially when attempting to update certain dependencies. Which is why having the graph command is useful.
Dev Dependencies
A common feature of package managers is to have separate dev dependencies. For running in production, it’s best to keep the application size as small as possible. Which means we generally don’t want to ship anything that’s not being used in production. This will often include things like packages for unit testing. Running the command below will install pytest as a dev dependency.
Pipfile
pipenv install pytest --dev
Our Pipfile should now include the following:
...
[packages]
flask = "*"

[dev-packages]
pytest = "*"
...
Installing Specific Versions
Installing specific versions can be done by adding == operator followed by the version number:
pipenv install requests==2.31.0
You’ll notice the specific version specified in the Pipfile.
Pipfile
...
[packages]
flask = "*"
requests = "==2.31.0"

[dev-packages]
pytest = "*"
...
It’s important to note that you can also simply add/update the version in the Pipfile and run pipenv install to achieve the same result.
Even though the version gets locked in the lock file regardless, destroying the lock file in this case would now result in the same version being installed.
You can also specify a version range like the following:
[packages]
requests = ">=2.31,<3"
This is a more flexible approach that allows for updates but is safer than allowing any version (specified by *). A major version update (i.e. to version 3) often has more drastic changes that could break API’s used by the application.
Removing Packages
This is very straightforward. The uninstall CLI command can be used to remove packages:
pipenv uninstall requests
Finding the Virtual Environment Path
Obtaining the path to the virtual environment is often needed in certain cases. Adding the path to our editor is necessary for autocomplete and intellisense to work with imported packages. Running pipenv --venv will output the path in the terminal.
brett$ pipenv --venv
/Users/user/.local/share/virtualenvs/pipenvtest-u5Lgc-F2
Loading the Virtual Environment
The shell command allows you to load the virtual environment in your terminal window. When the virtual environment is loaded, you will see the name of the virtual environment on the left side of the terminal prompt in parentheses.
pipenv shell
Once the shell is loaded, any python command will use the version of Python from the virtual environment. Exiting the shell is as simple as entering an “exit” command.
Exit the shell:
exit
Running Python from Outside the Shell
There will be times you’ll want to use your virtual environment without having to load the shell. The run command handles this situation. If you just want to run an interactive Python console, that can be achieved with the following:
Python Console:
pipenv run python
The majority of the time, however, you’ll want to run a script or launch a web server. if the file you want to run is main.py, for example, that can be handled with the following:
Running a Python Script:
pipenv run python main.py
Install Packages from Lockfile
In certain environments, such as CI or production, you’ll want to install packages exactly as defined in the lock file. You can simply pass the ignore-pipfile option with the install command.
pipenv install --ignore-pipfile
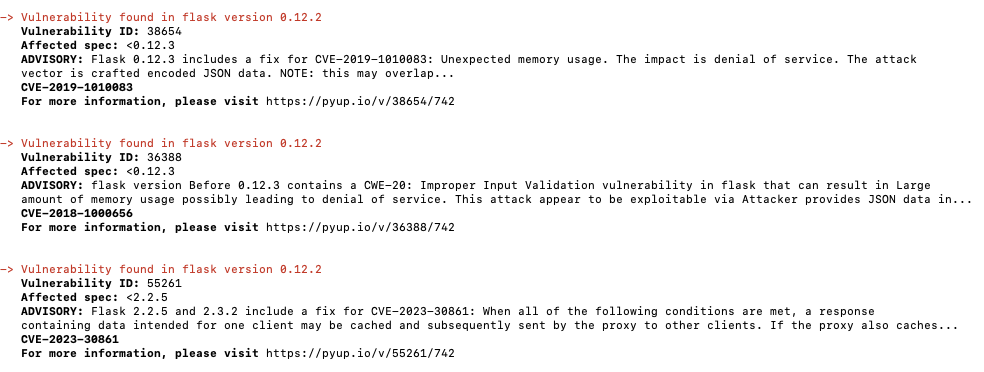
Check for Security Vulnerabilities
The check command will check the PyUp/Safety security vulnerability database to see if any of your installed packages are an issue.
pipenv check
Here’s an example for running the check command using an old project:
Switching to Pipenv from pip
If you have an existing project you wish to convert to using pipenv, it can be easily done if you have a requirements.txt file. Simply add the -r option followed by the filename:
pipenv install -r requirements.txt
Generate Requirements File
In certain cases, you’ll want to still create a requirements.txt file. Maybe you want to share the application with someone not using pipenv. The requirements command will create this file for you. The requirements command itself will output the requirements to the screen, so standard out must be used to actually write the requirements to a file.
pipenv requirements > requirements.txt
Cleanup and Remove Virtual Environment
The --rm option will completely remove your virtual environment.
pipenv --rm
Posted in python