Hosting a Static Website on Amazon S3 with CloudFront and SSL
Hosting a Static Website on Amazon S3 with CloudFront and SSL
In this post, we will walk through setting up a static website on AWS. Throughout this post, I will be using mountainbiketrailmaps.com as an example. This is a domain name I bought awhile back, but never actually did anything with it.
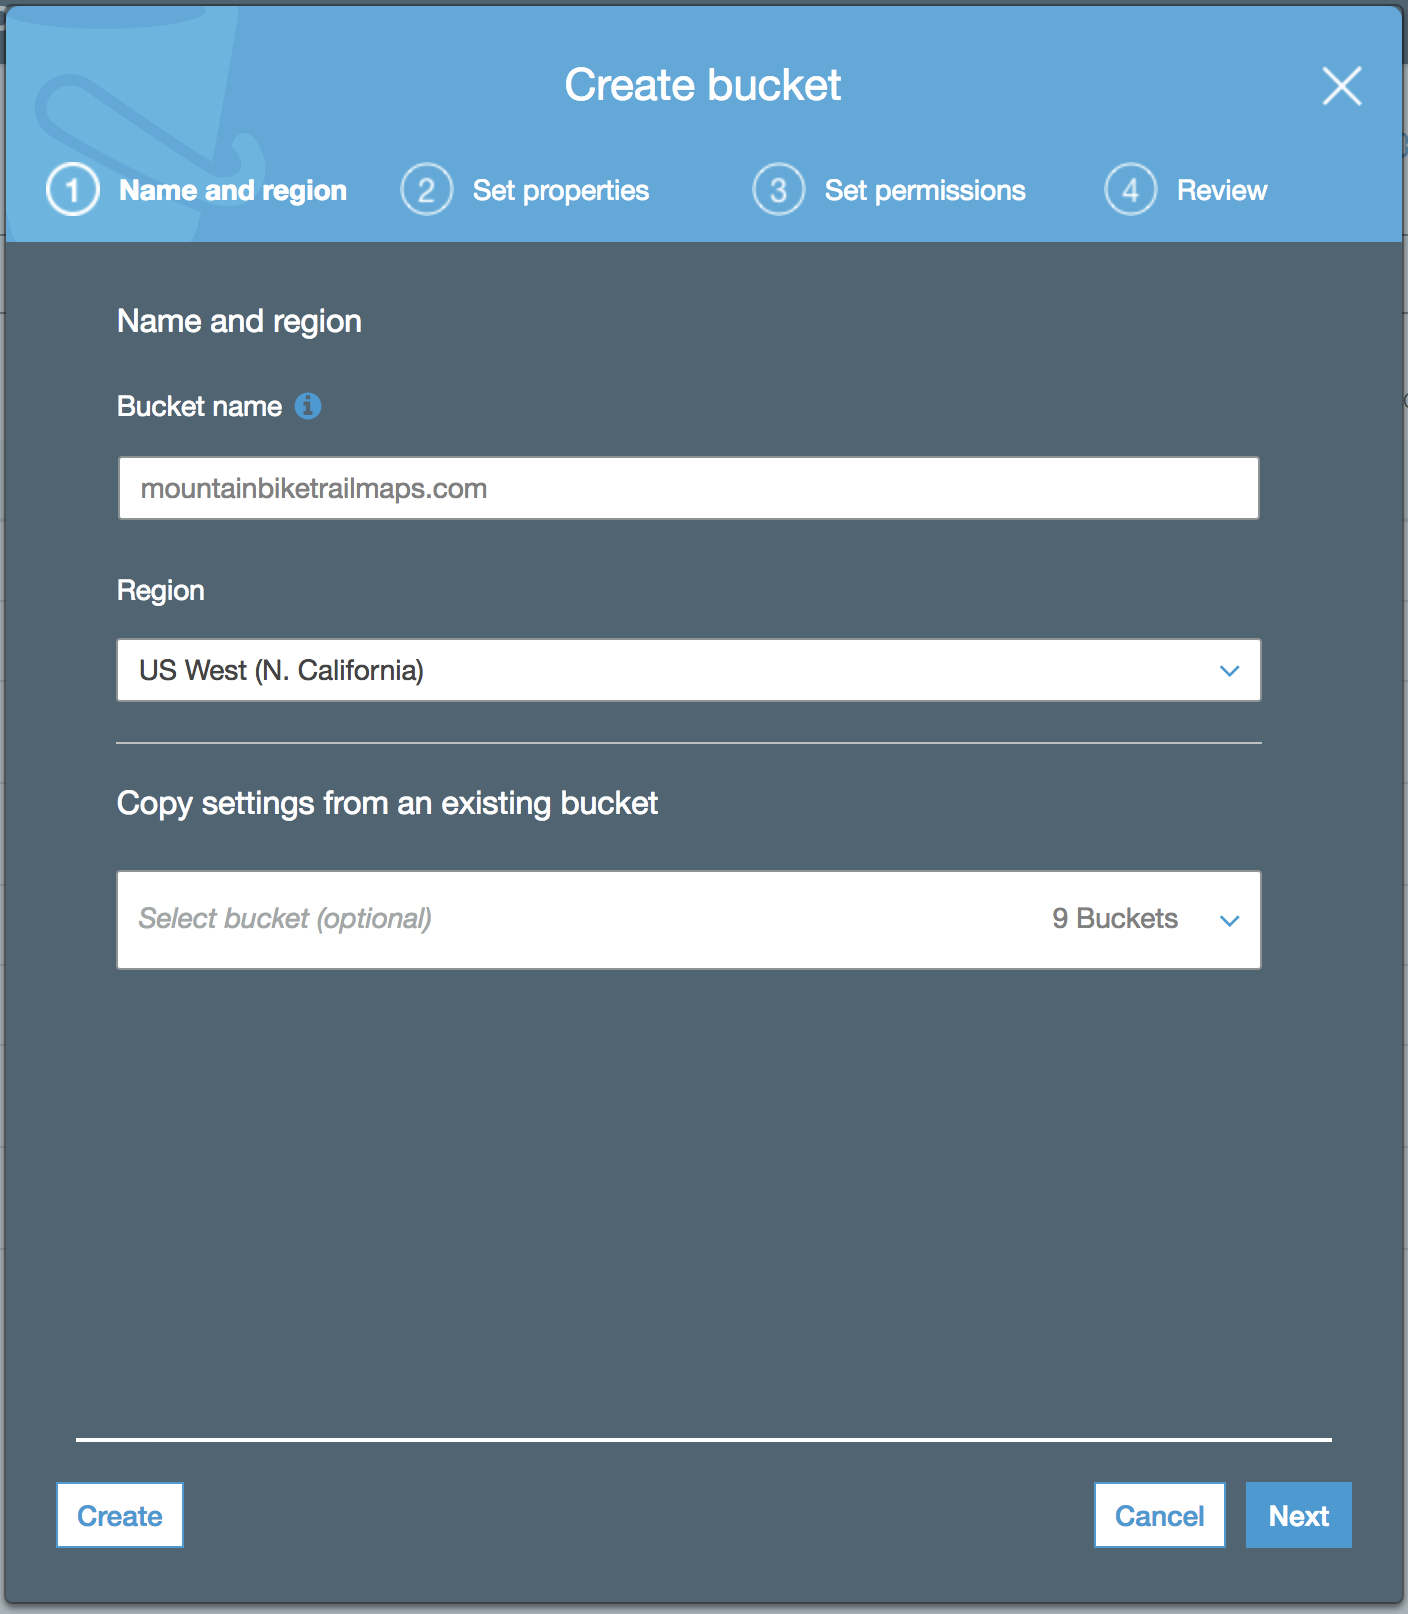
The first step will be to add a new bucket name. The name of the bucket should match the domain name of the site. I’ll be naming mine www.mountainbiketrailmaps.com. Select your region from the Region dropdown. Click “Create” to continue.

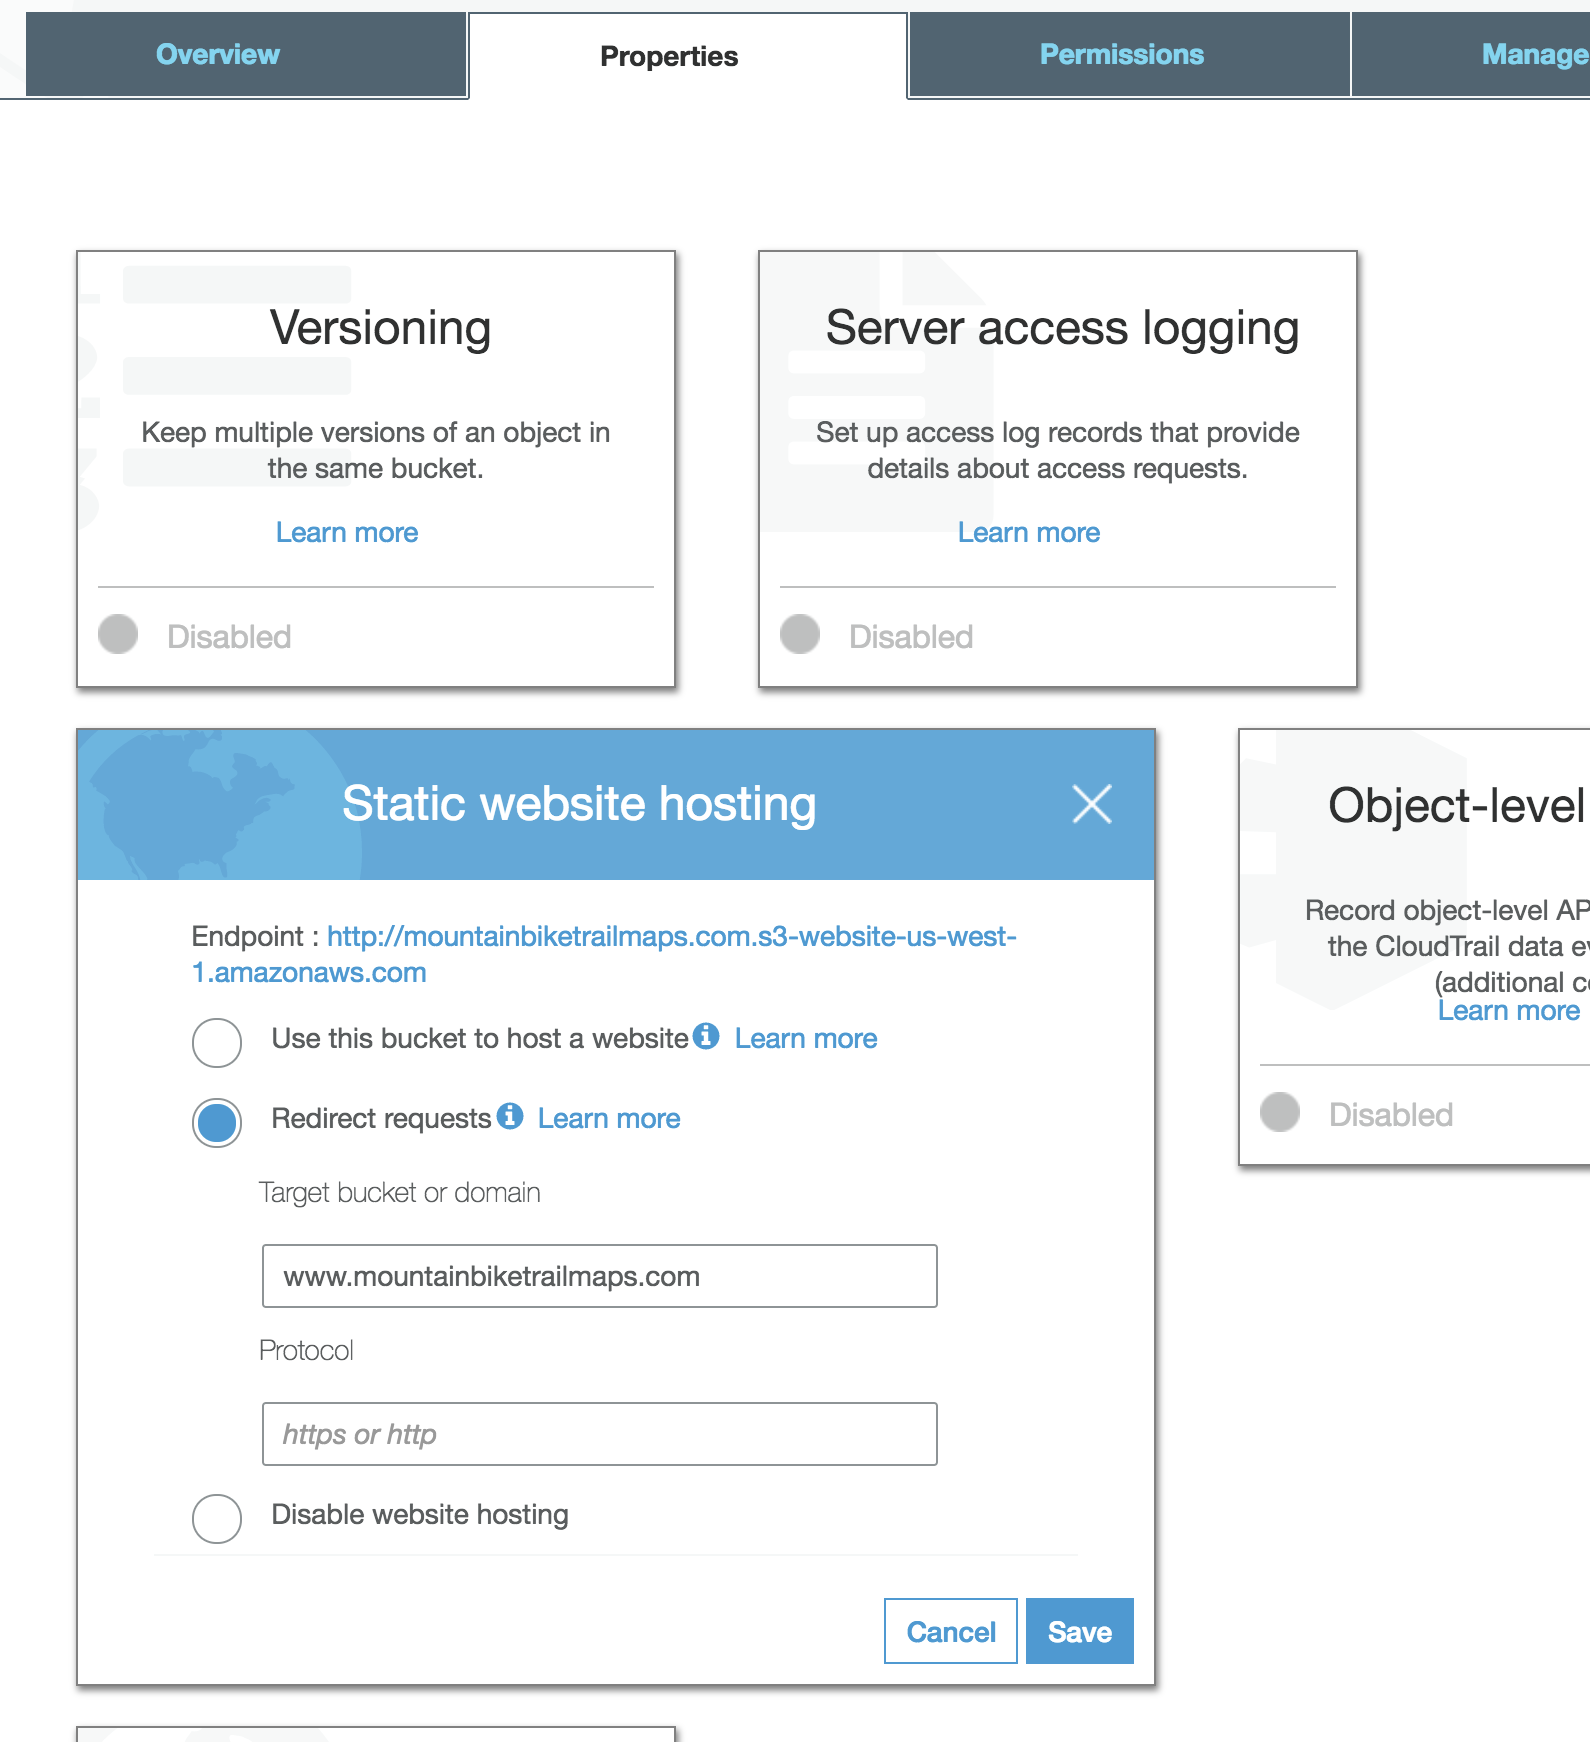
The new bucket should appear on the S3 bucket list page. Click to enter your new bucket. Then click the “Properties” tab. A “Static website hosting” panel should appear.
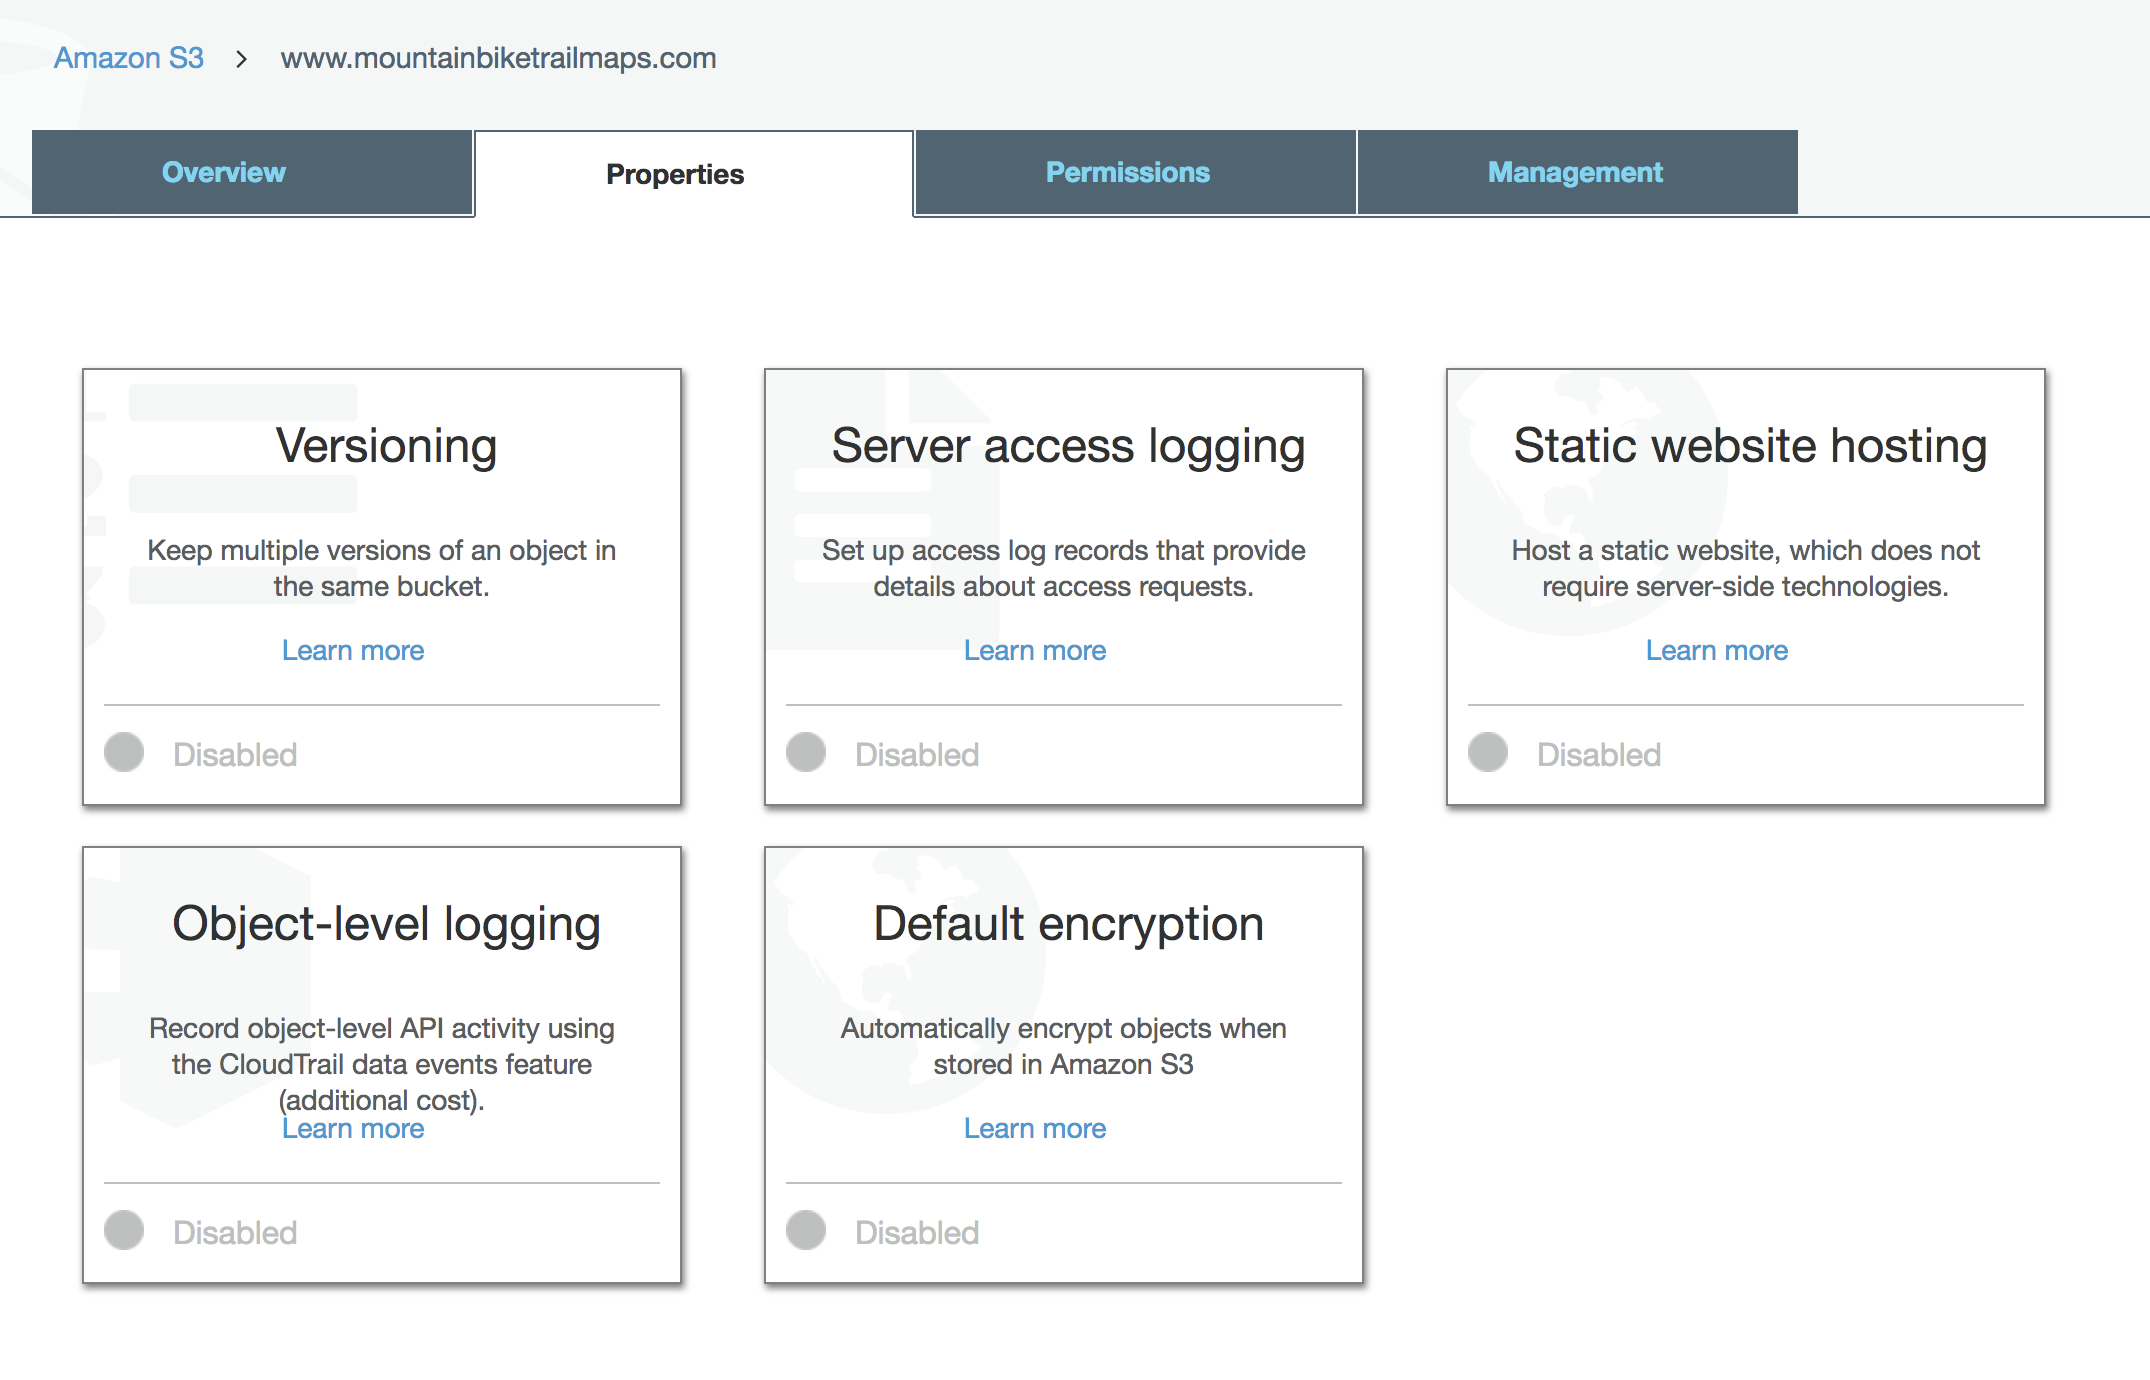 Click “Static website hosting”. Here, you can fill in your index page and error page.
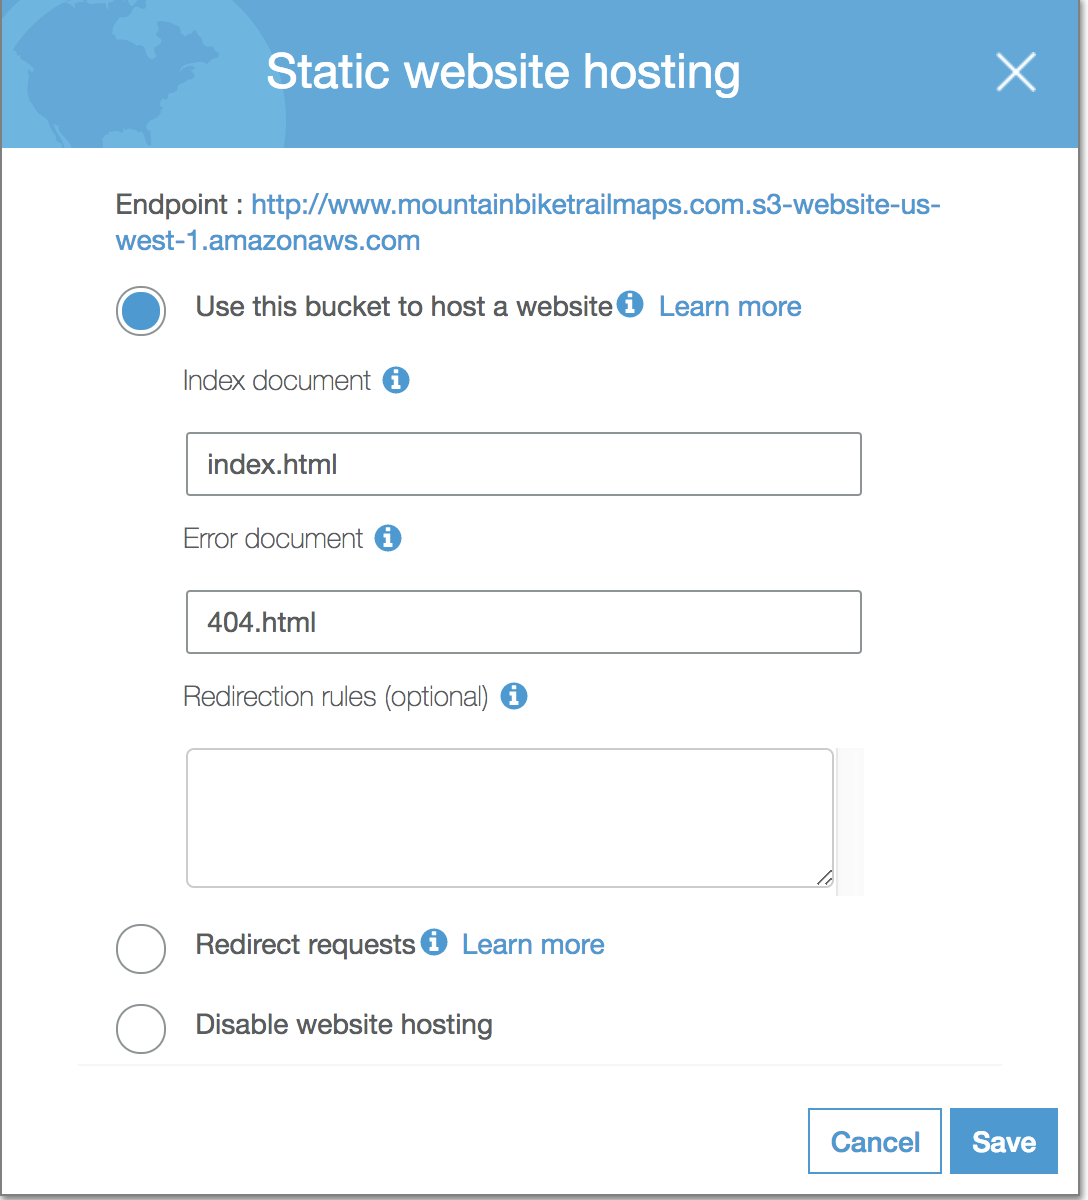
Click “Save”. Note: be sure to copy down the endpoint URL from your “Static website hosting” panel. You will need this later when setting up your CloudFront distribution.
Setting Bucket Policy
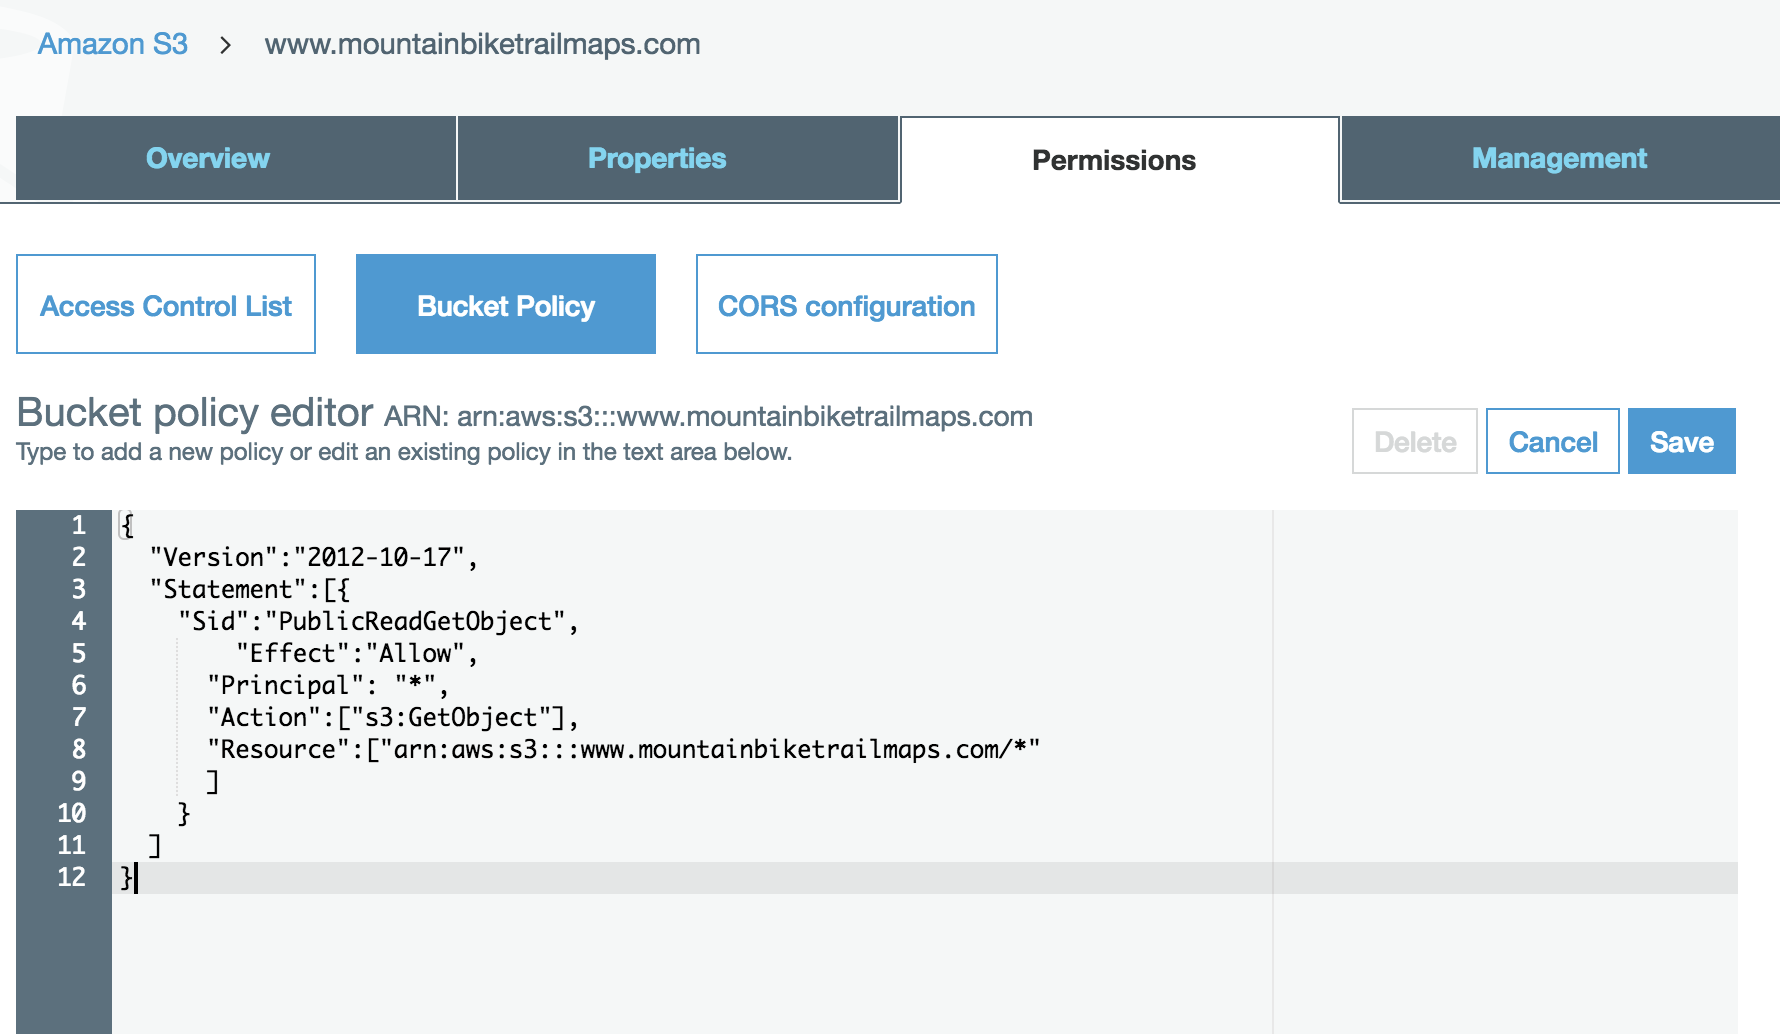
Next, we need to setup our Bucket Policy. This is necessary to allow public read access so we can load our webpages in the browser. The Bucket Policy can be accessed in the “Permissions” tab. Be sure to click the “Bucket Policy” button to make the textarea appear.
{
  "Version":"2012-10-17",
  "Statement":[{
    "Sid":"PublicReadGetObject",
        "Effect":"Allow",
      "Principal": "*",
      "Action":["s3:GetObject"],
      "Resource":["arn:aws:s3:::www.mountainbiketrailmaps.com/*"
      ]
    }
  ]
}
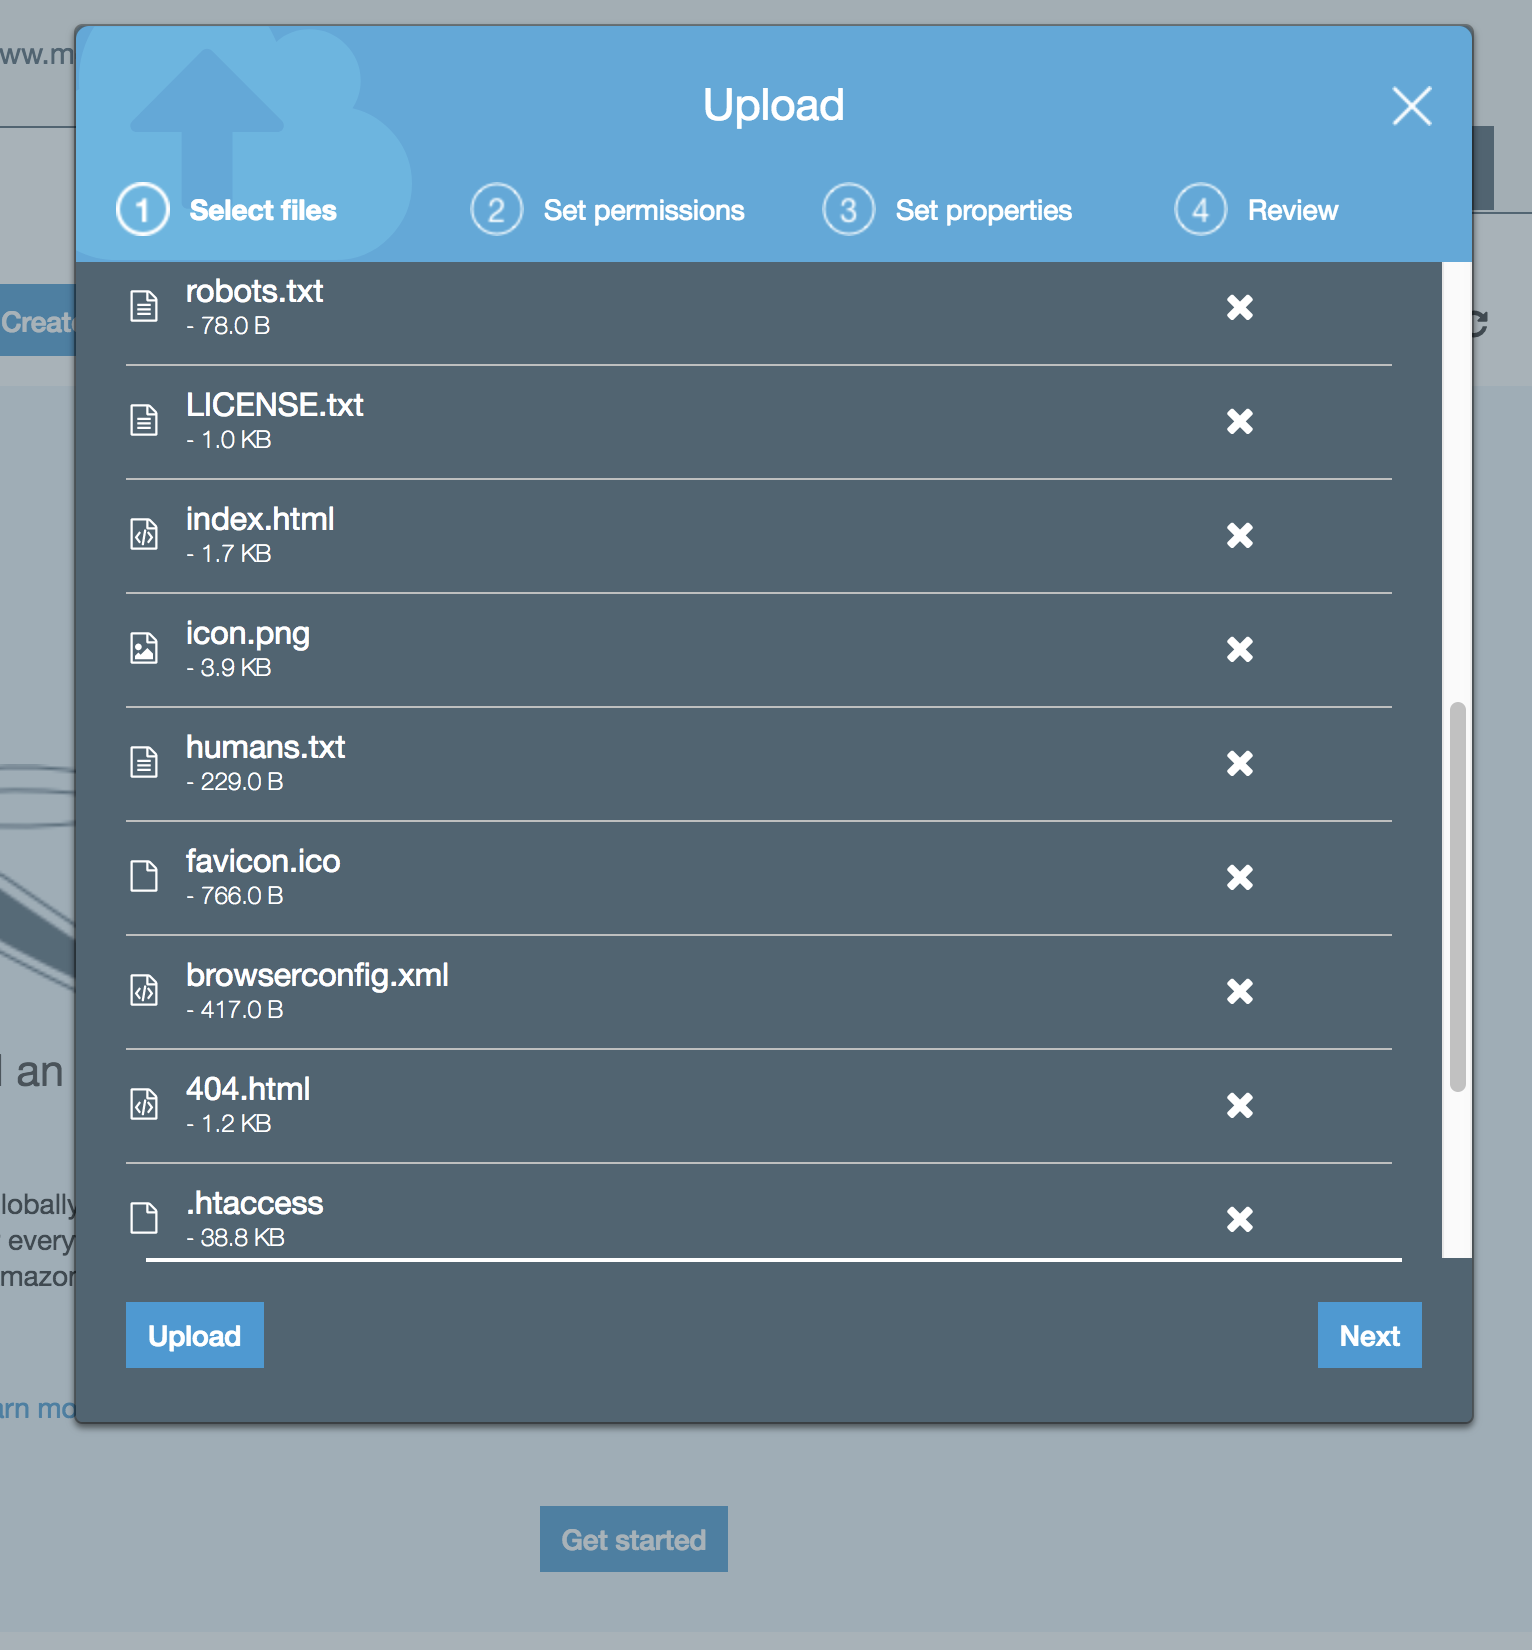
At this point, we can go ahead and upload files. Switch back to the “Overview” tab. Clicking the “Upload” button should make the modal Upload window appear. In this example, I am simply going to drag and drop a bunch of files from HTML5Boilerplate, which is a good starting point for a web application project.
We can now view our website in the browser to make sure everything is setup correctly thus far. Since we have not setup our custom domain, we can use the default domain that AWS gives us. The default domain uses the following convention: <bucket-name>.<s3-website-region>.amazonaws.com. In our case, the default domain is http://www.mountainbiketrailmaps.com.s3-website-us-west-1.amazonaws.com/.
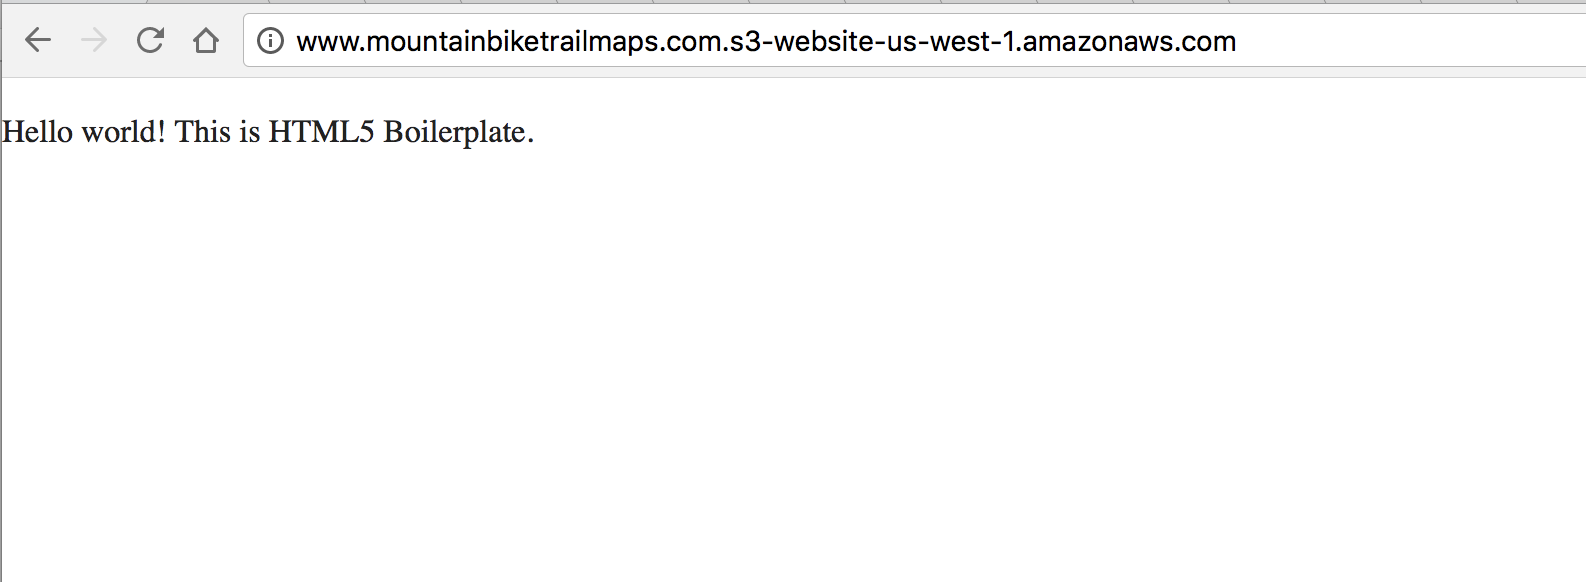
Obviously, another “Hello world” is not very impressive. However, by viewing the page source in the browser, you’ll see that HTML5 Boilerplate is actually doing quite a bit. It’s pulling in things like normaized CSS, jQuery, and Modernizr.
Setting Up a Custom Domain
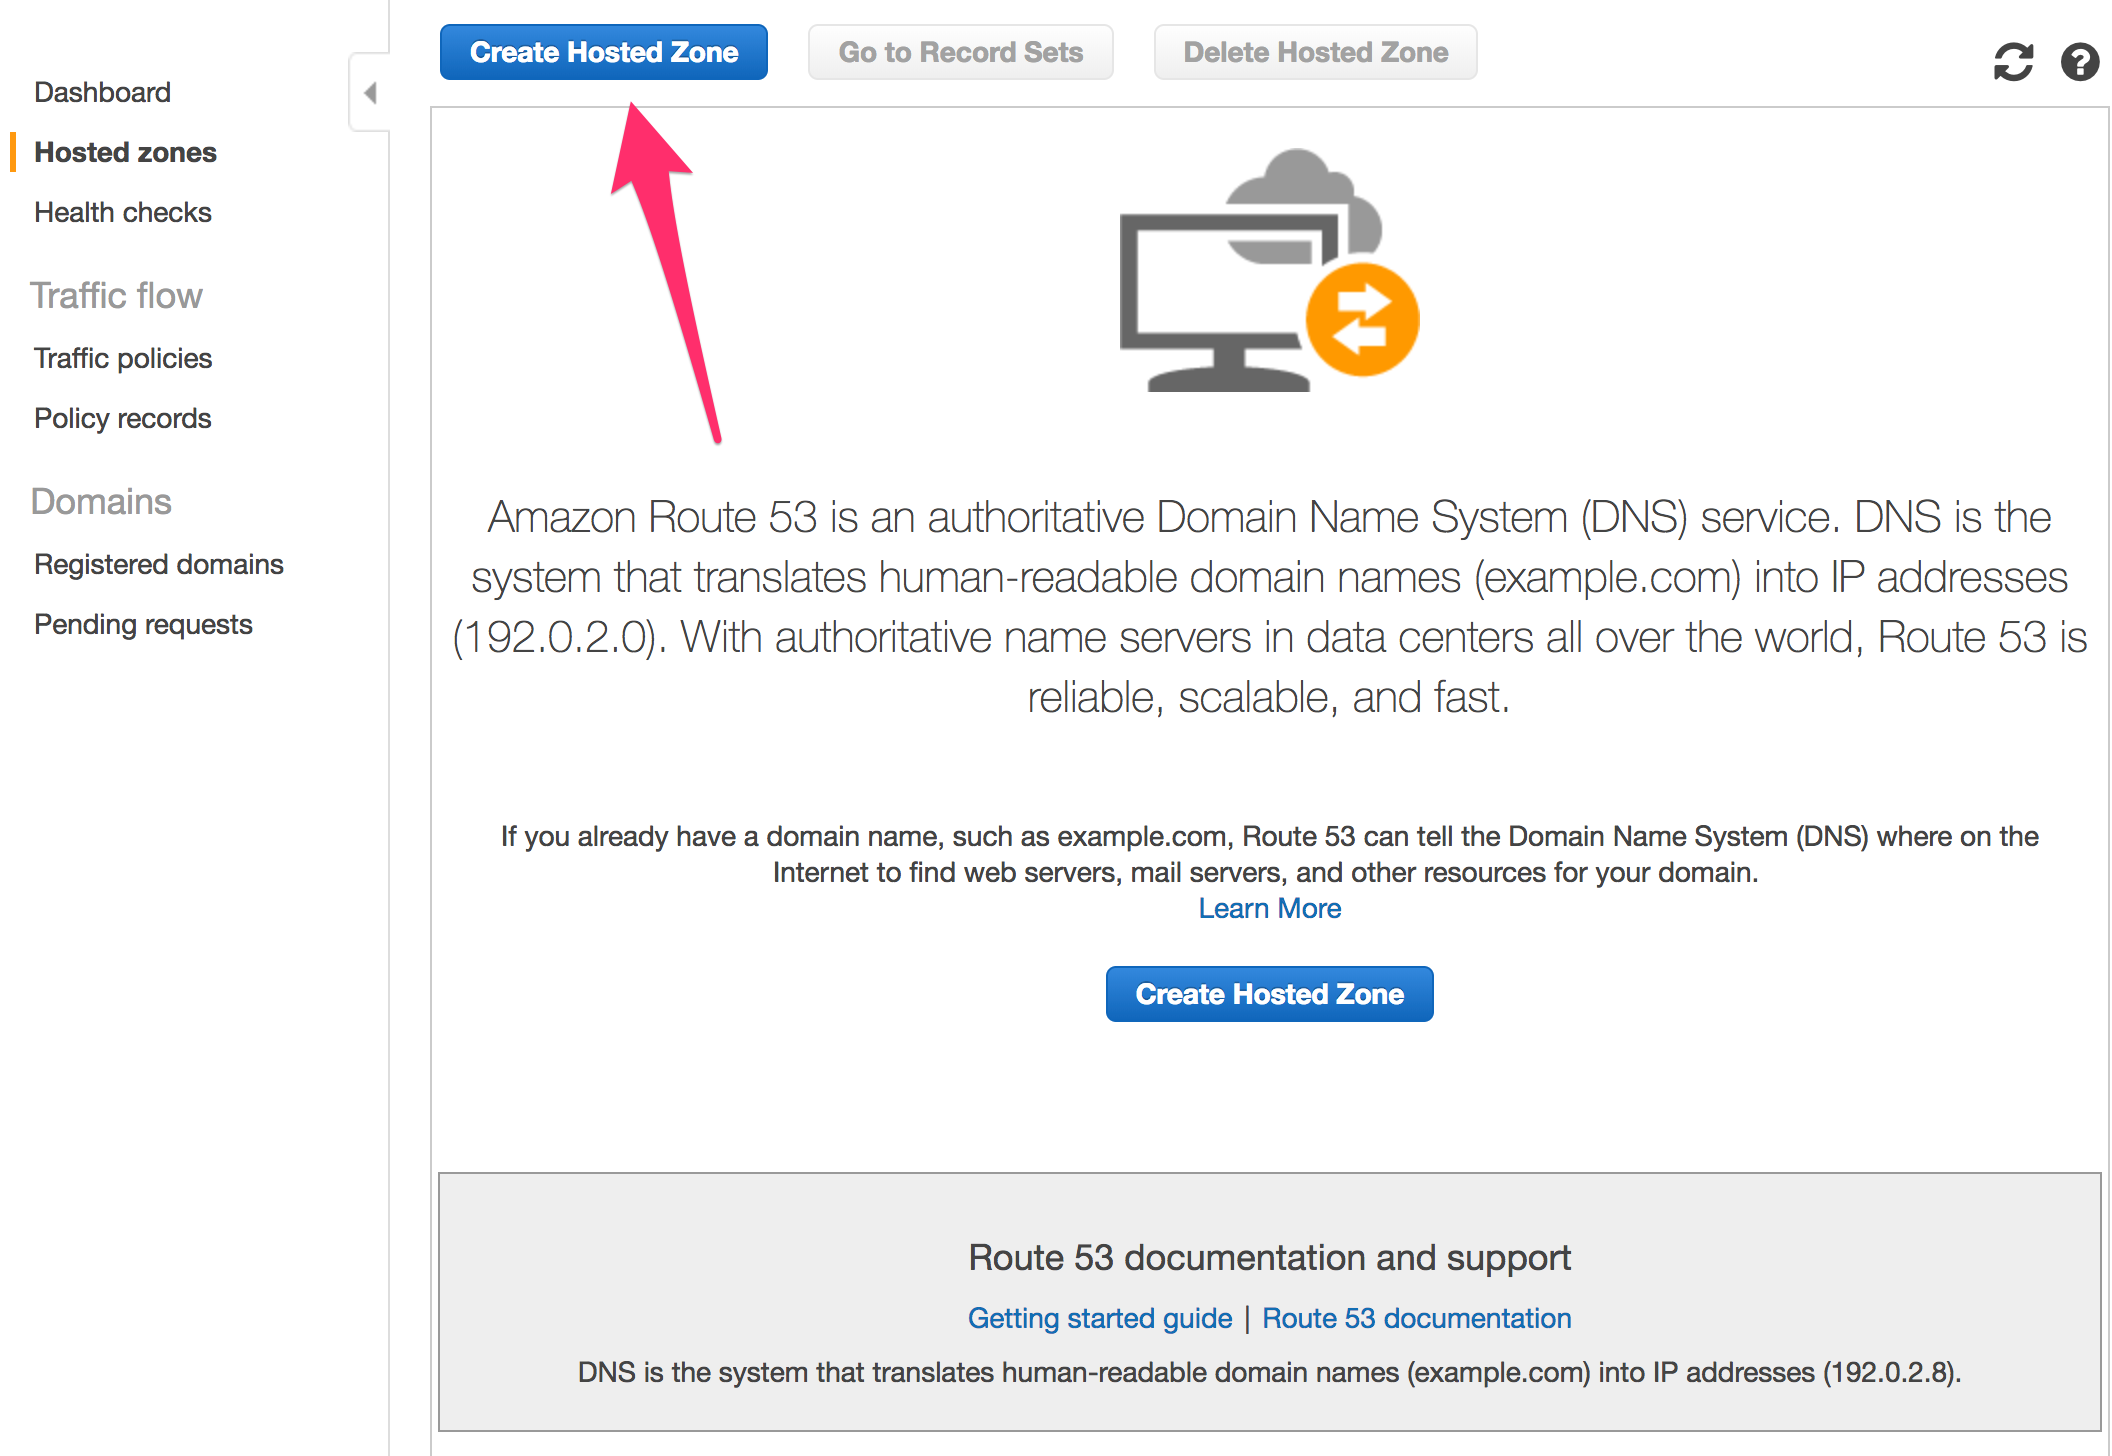
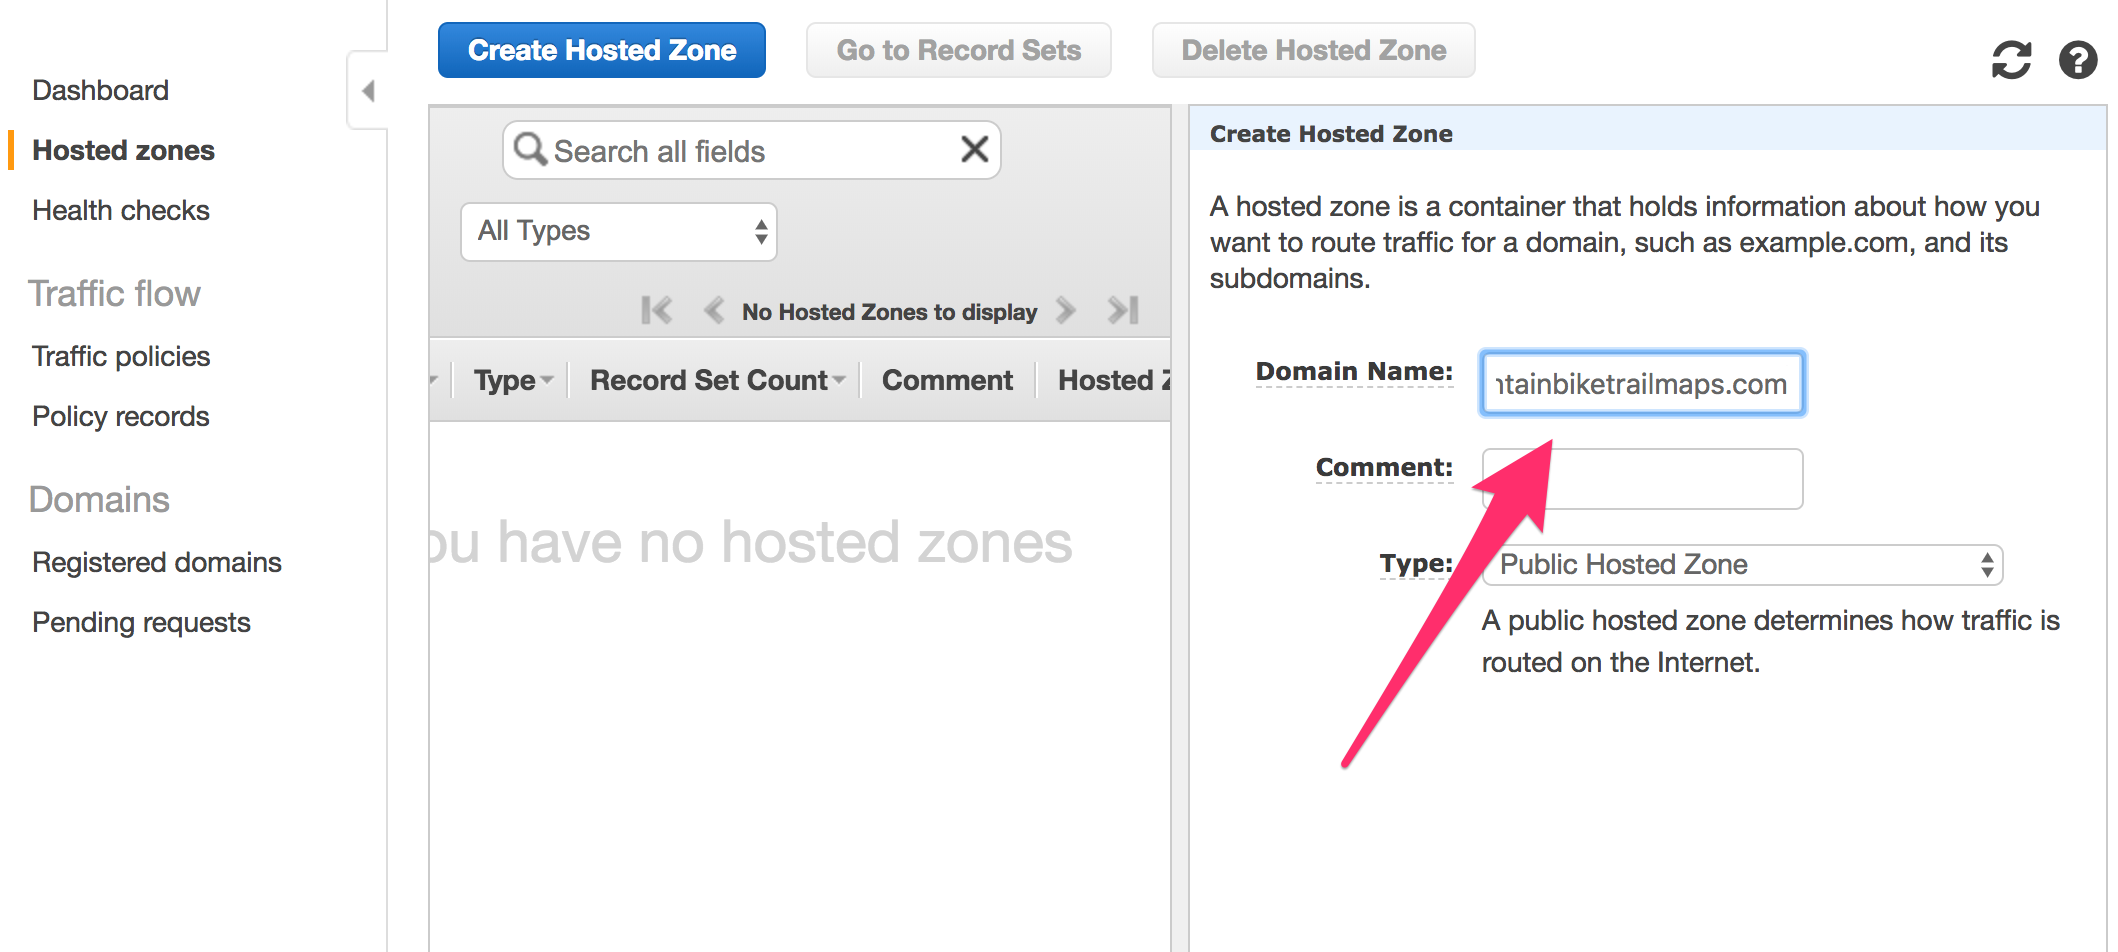
Setting up a custom domain will require a few steps. For starters, if your domain is registered through a registrar outside of AWS, you can setup a new Hosted Zone in Route 53 to handle your DNS. Within the AWS Console, navigate to the Route 53 section, create a new Hosted Zone. You’ll need to enter your domain name in the right column.
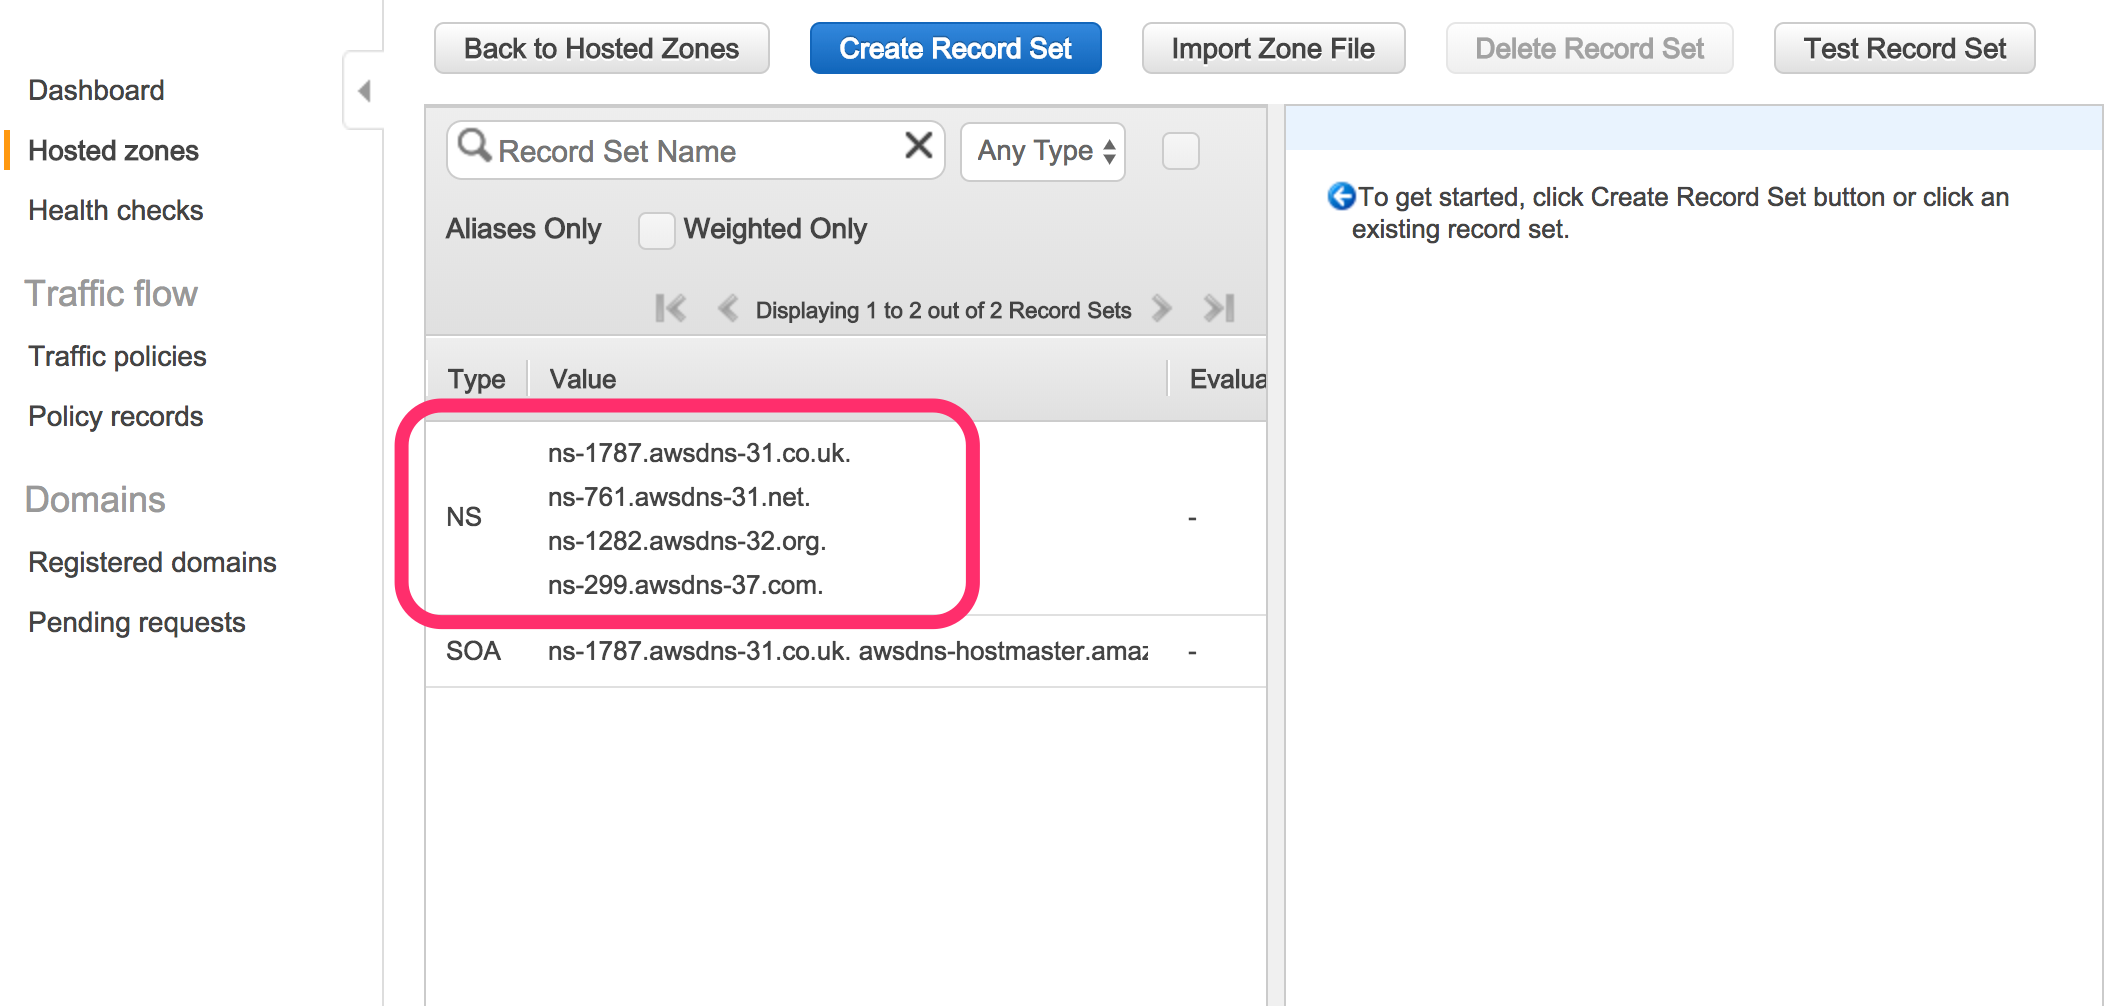
After submitting this form, you should get a list of 4 nameservers. If you registrar is not AWS, you’ll need to copy these, and log in to your domain registrar and change your existing nameservers to these. Note: it may take some time for DNS records to update after completing this step.
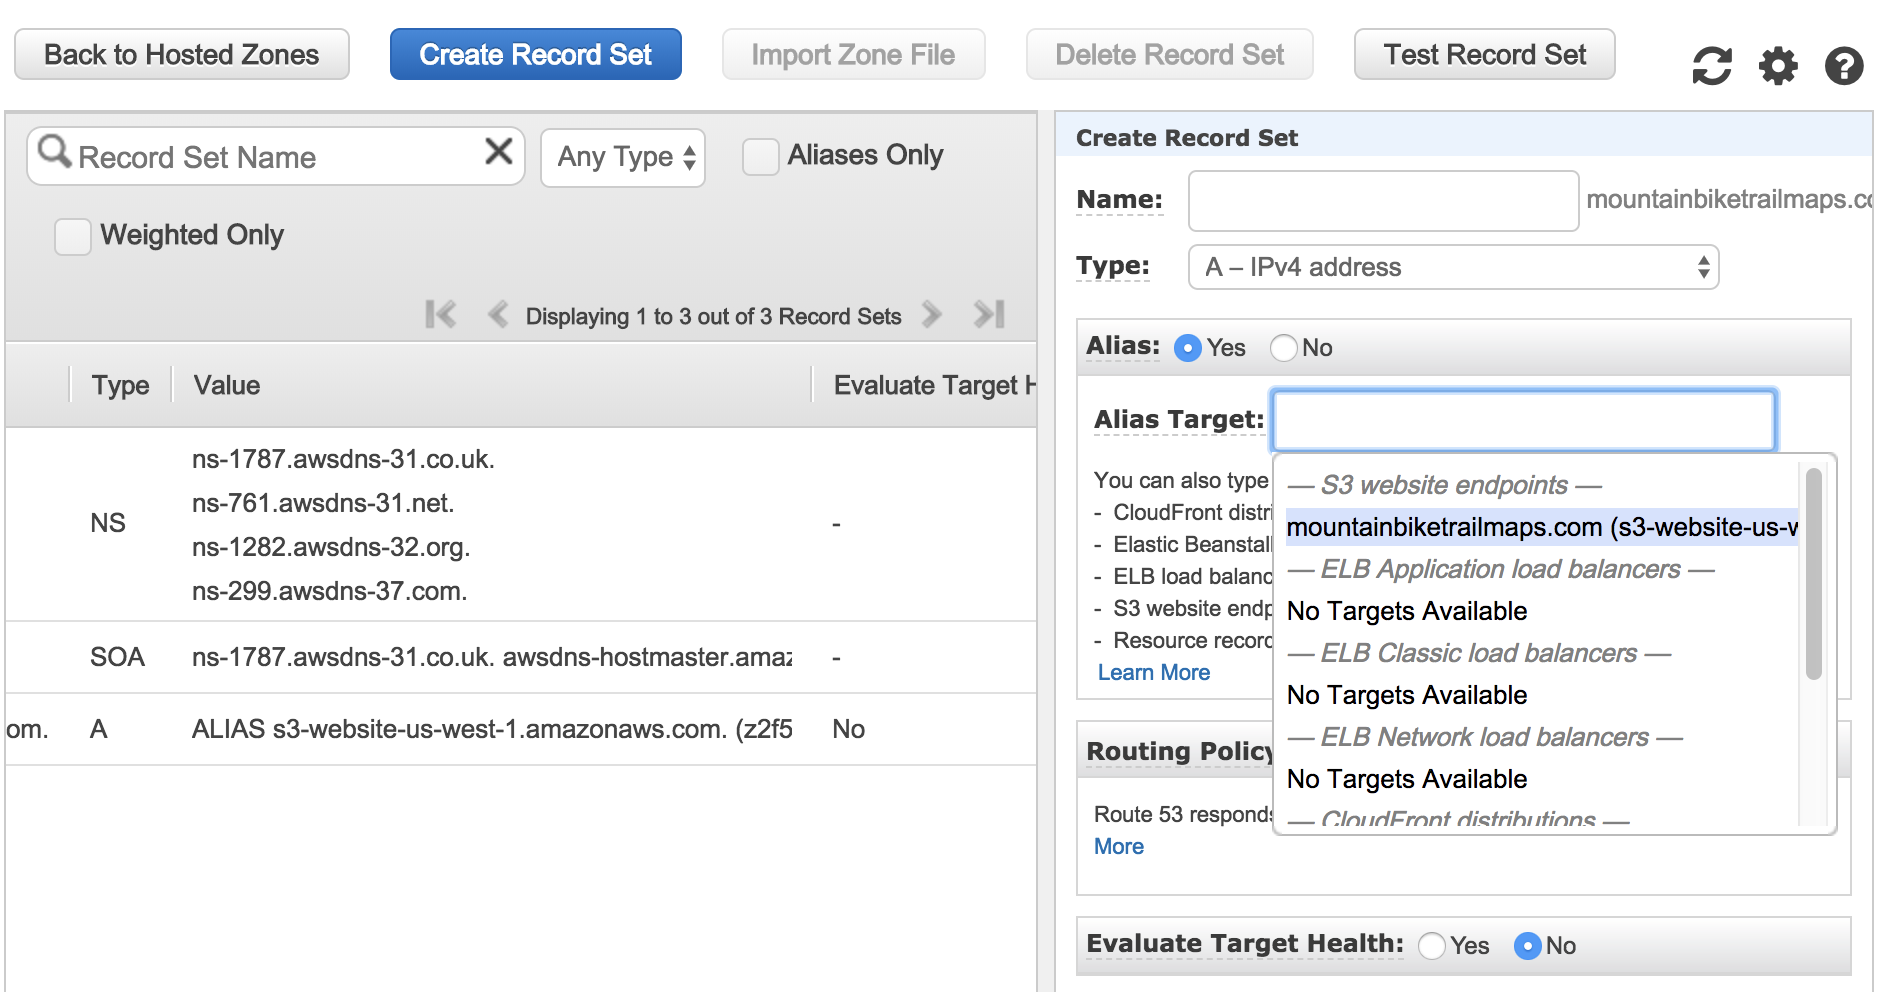
The next step will involve creating a new record set. Since our original bucket used the www subdomain, our alias will be required to match that as well.
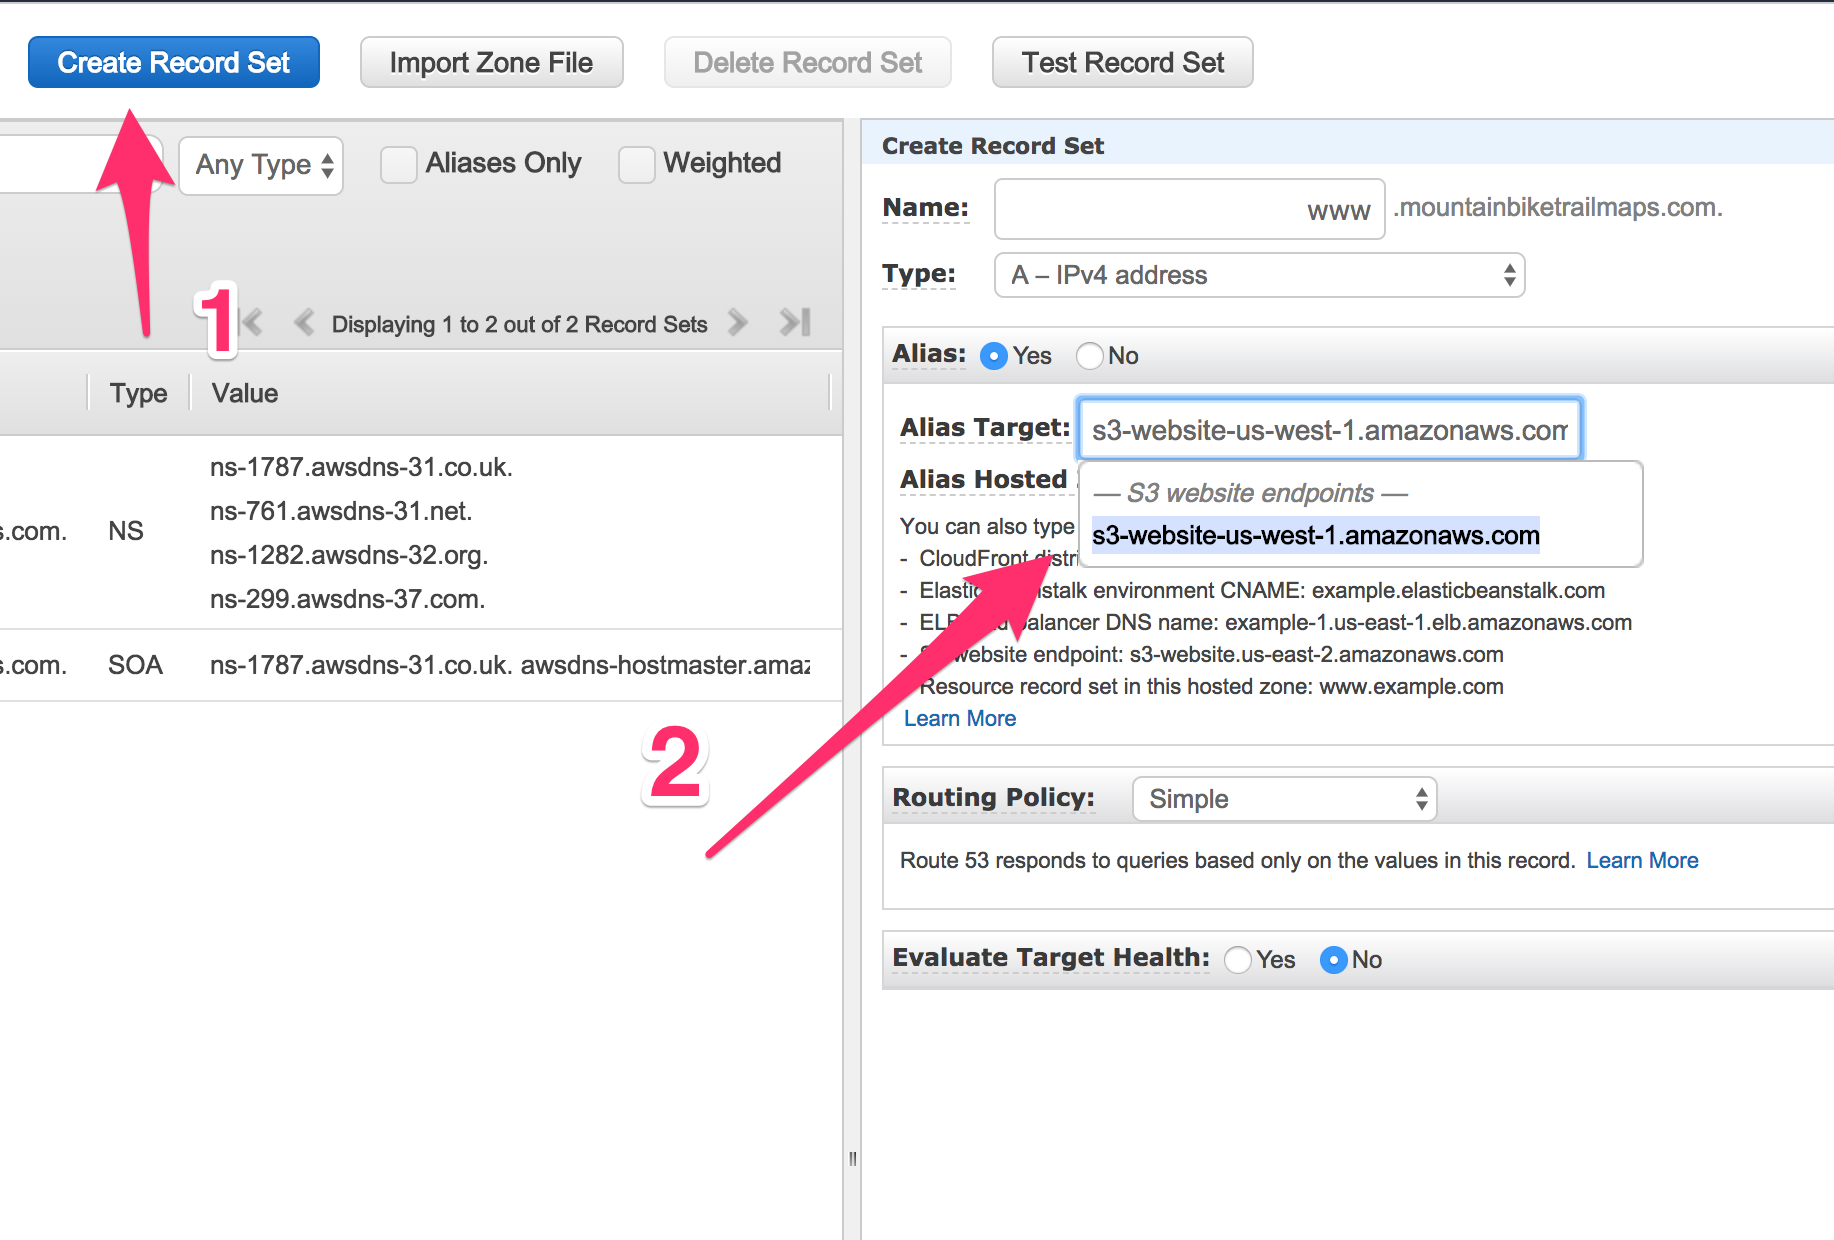
Now that we’ve added our alias record, users may attempt to visit our site using the non-www alias. So, we should create a record for that also.
Since the naming convention requires us to have a matching bucket, we will need to create a second bucket. Once setup, we won’t be needing to touch it again because it will be a simple redirect to the other bucket. So, we’ll only need to upload files in one place.
Similar to the fist bucket, create a second, entering only the root domain as the bucket name.
Click “Create”. Then, click on the bucket name, followed by the “Properties” tab. Select the “Static website hosting” tile.
Once this step is complete, we can return to Route 53 and add another alias record.
At this point, our custom domain has been setup. This would now be a good time to setup SSL so we can use HTTPS. Since we’re already setup in Route 53, this free service offered by AWS will be easy to configure.
SSL Certificate
Certificate Manager is a product within AWS for setting up SSL.
In step 1, we want to add 2 items. The first will be the wildcard for all subdomains, *.mountainbiketrailmaps.com. The second will be our base domain, mountainbiketrailmaps.com.
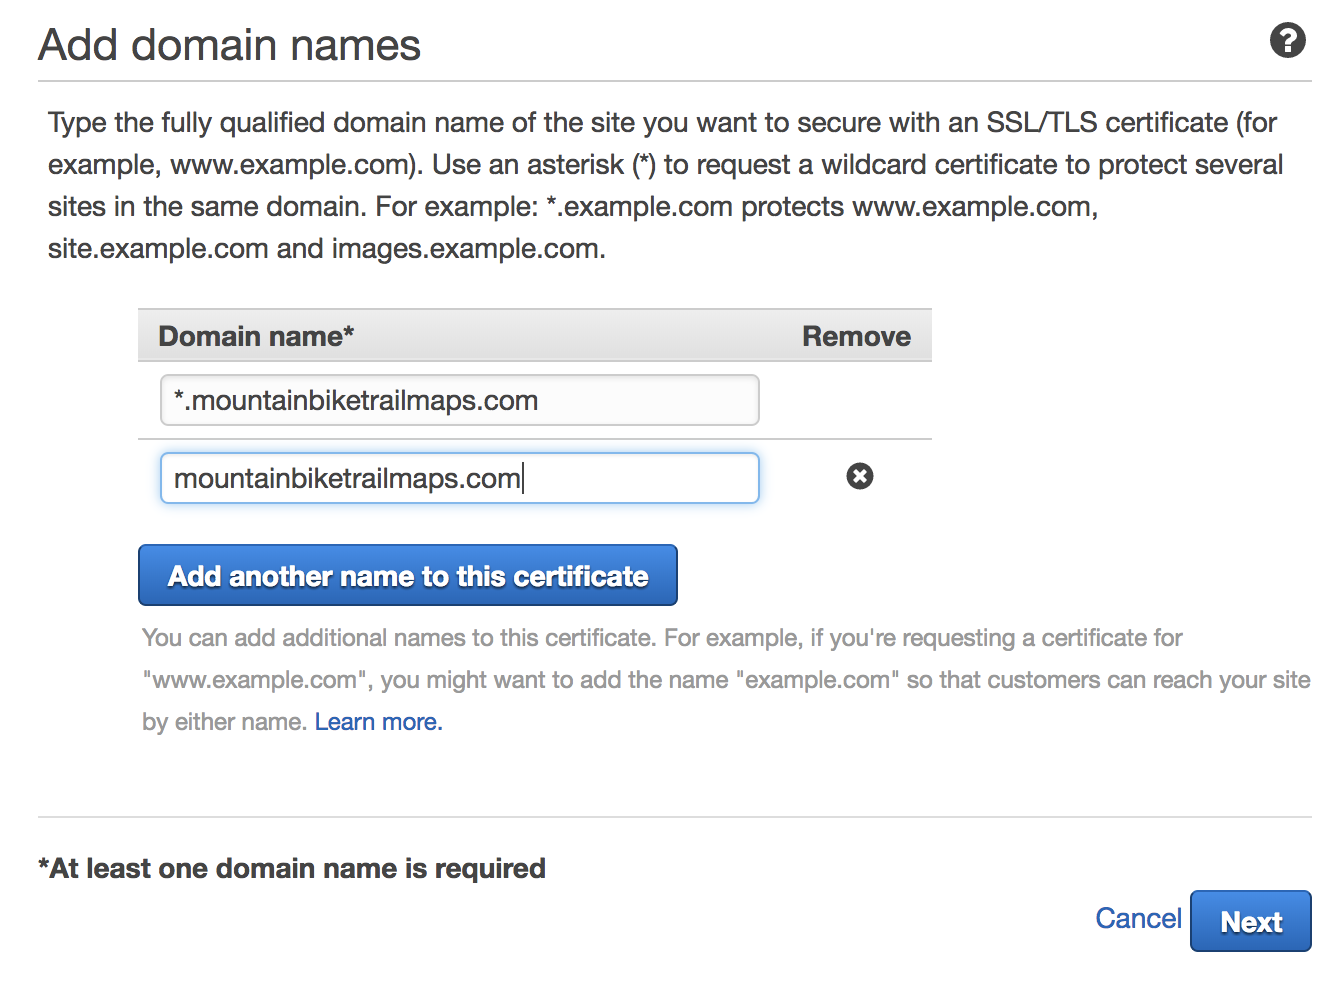 In Step 2, we want to select the radio button “DNS validation”. Since we’re already setup in Route 53, this will be very easy. In Step 3, click “Confirm and request”. In the last step, you’ll likely see “Pending validation” in the validation status column. What you want to do here is click the arrow to expand the domain. When expanded, you will see the “Create record in Route 53” buttons for each domain entry. Click each of these.
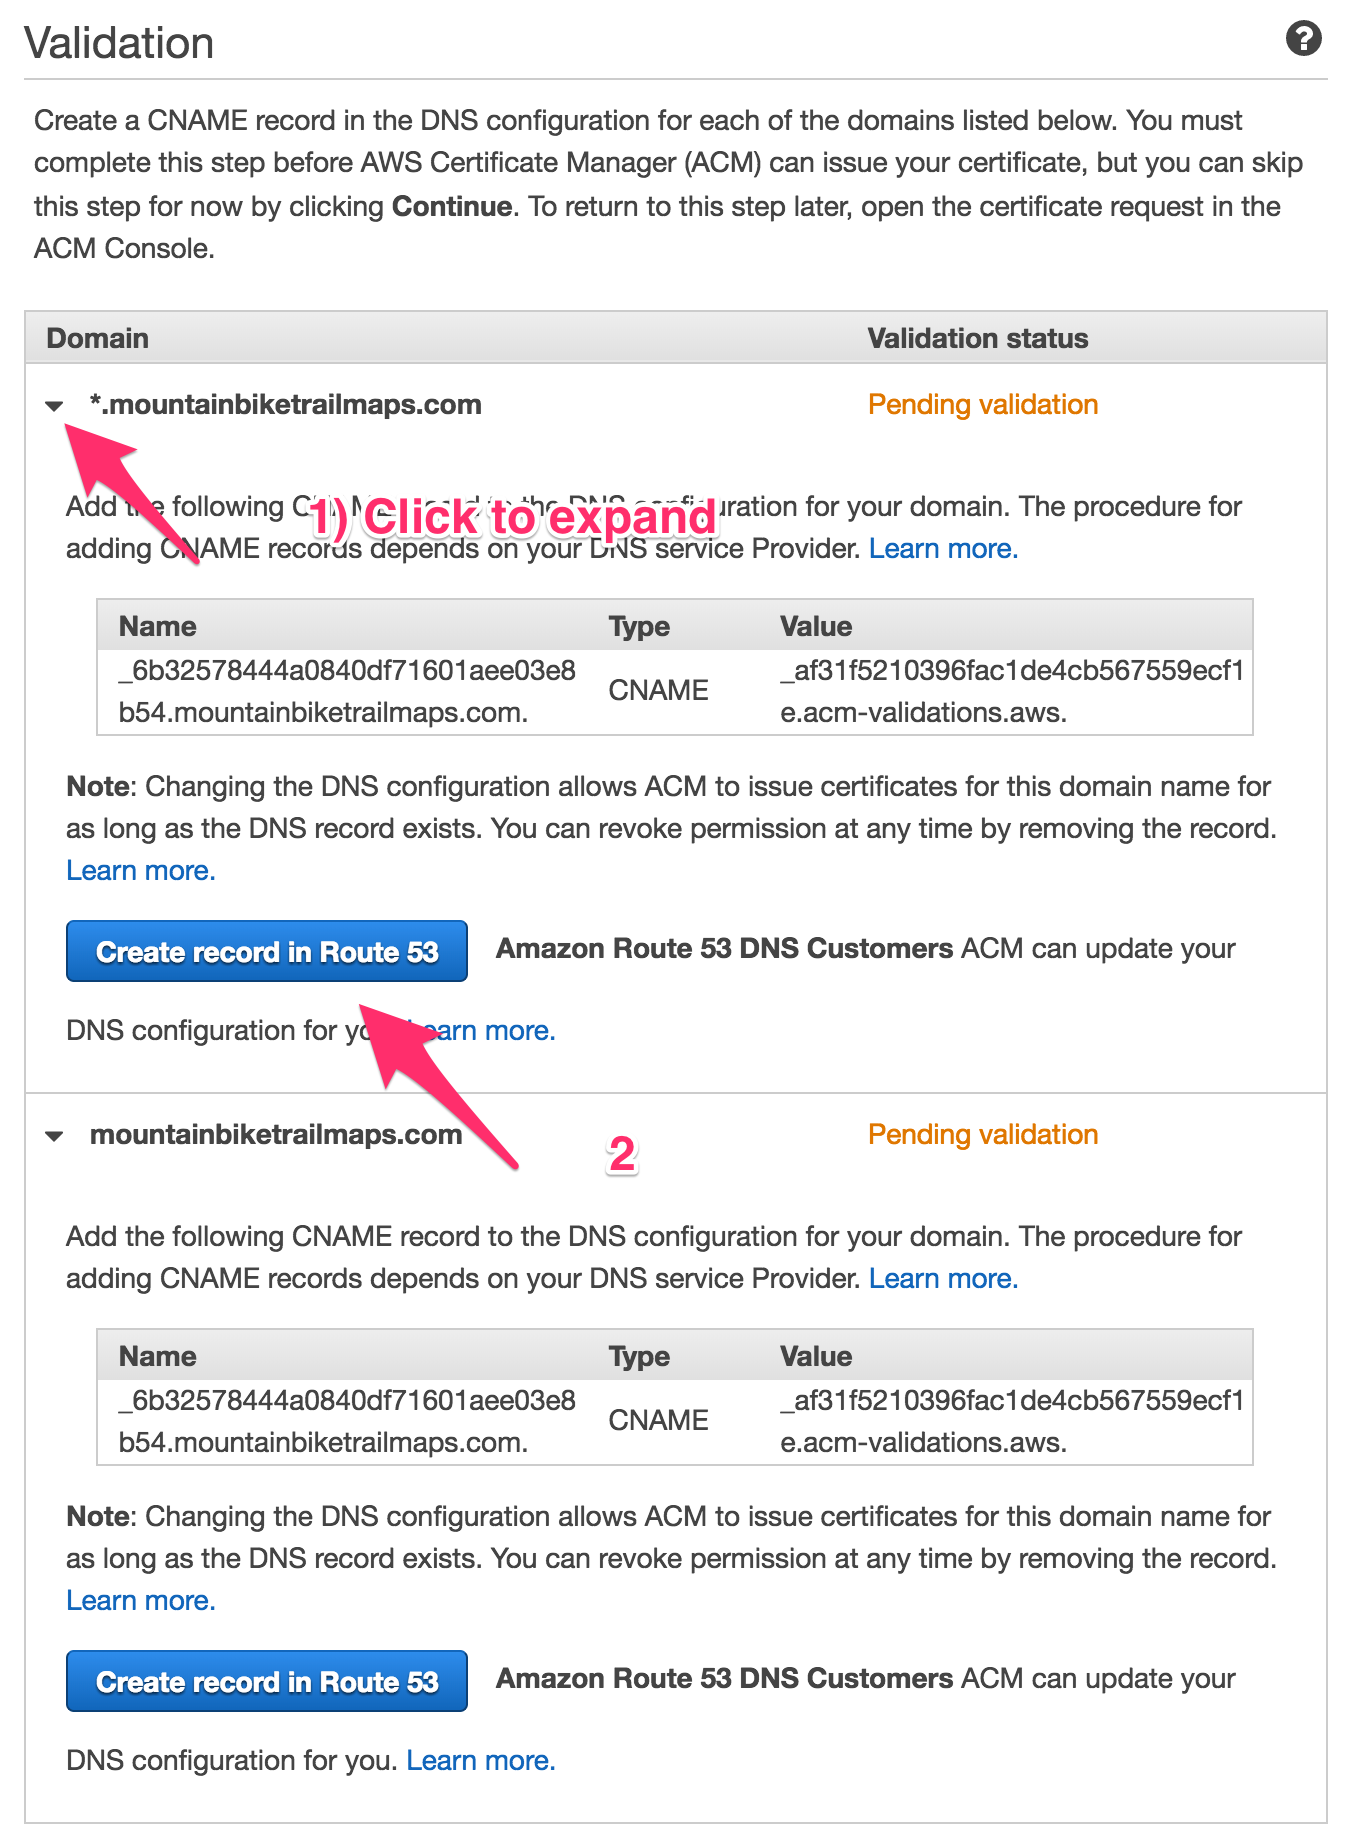 The validation process will take at least several minutes to complete.
Creating a CloudFront Distribution
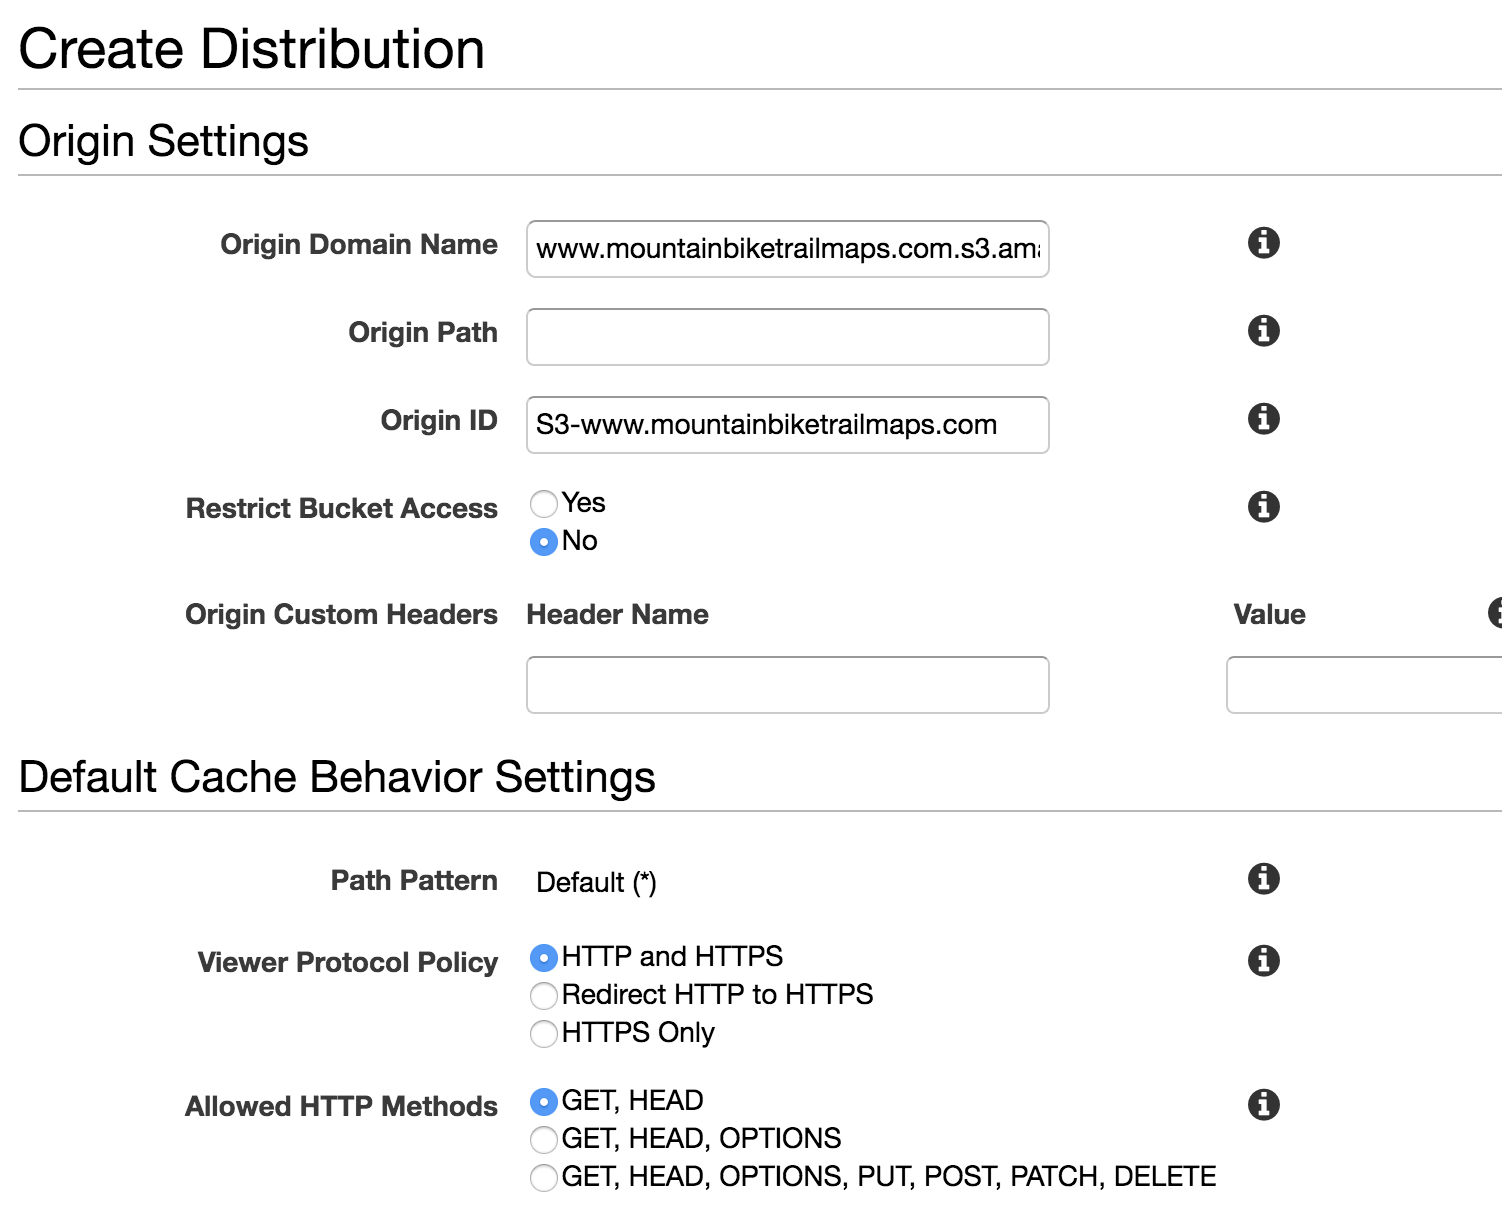
Navigate to CloudFront inside the AWS Console. Click “Create Distribution”. You’ll see to different delivery methods to choose from. Select “Web”. Clicking in the “Origin Domain Name” field should show a dropdown with your S3 bucket.
Important: to get your site to work, you will need to enter the full url you got when creating the bucket (http://www.mountainbiketrailmaps.com.s3-website-us-west-1.amazonaws.com in my case). The pre-populated value in the dropdown is incorrect for what we’re attempting to use this for.
 Note:
Note: HTTPS only may also be used.
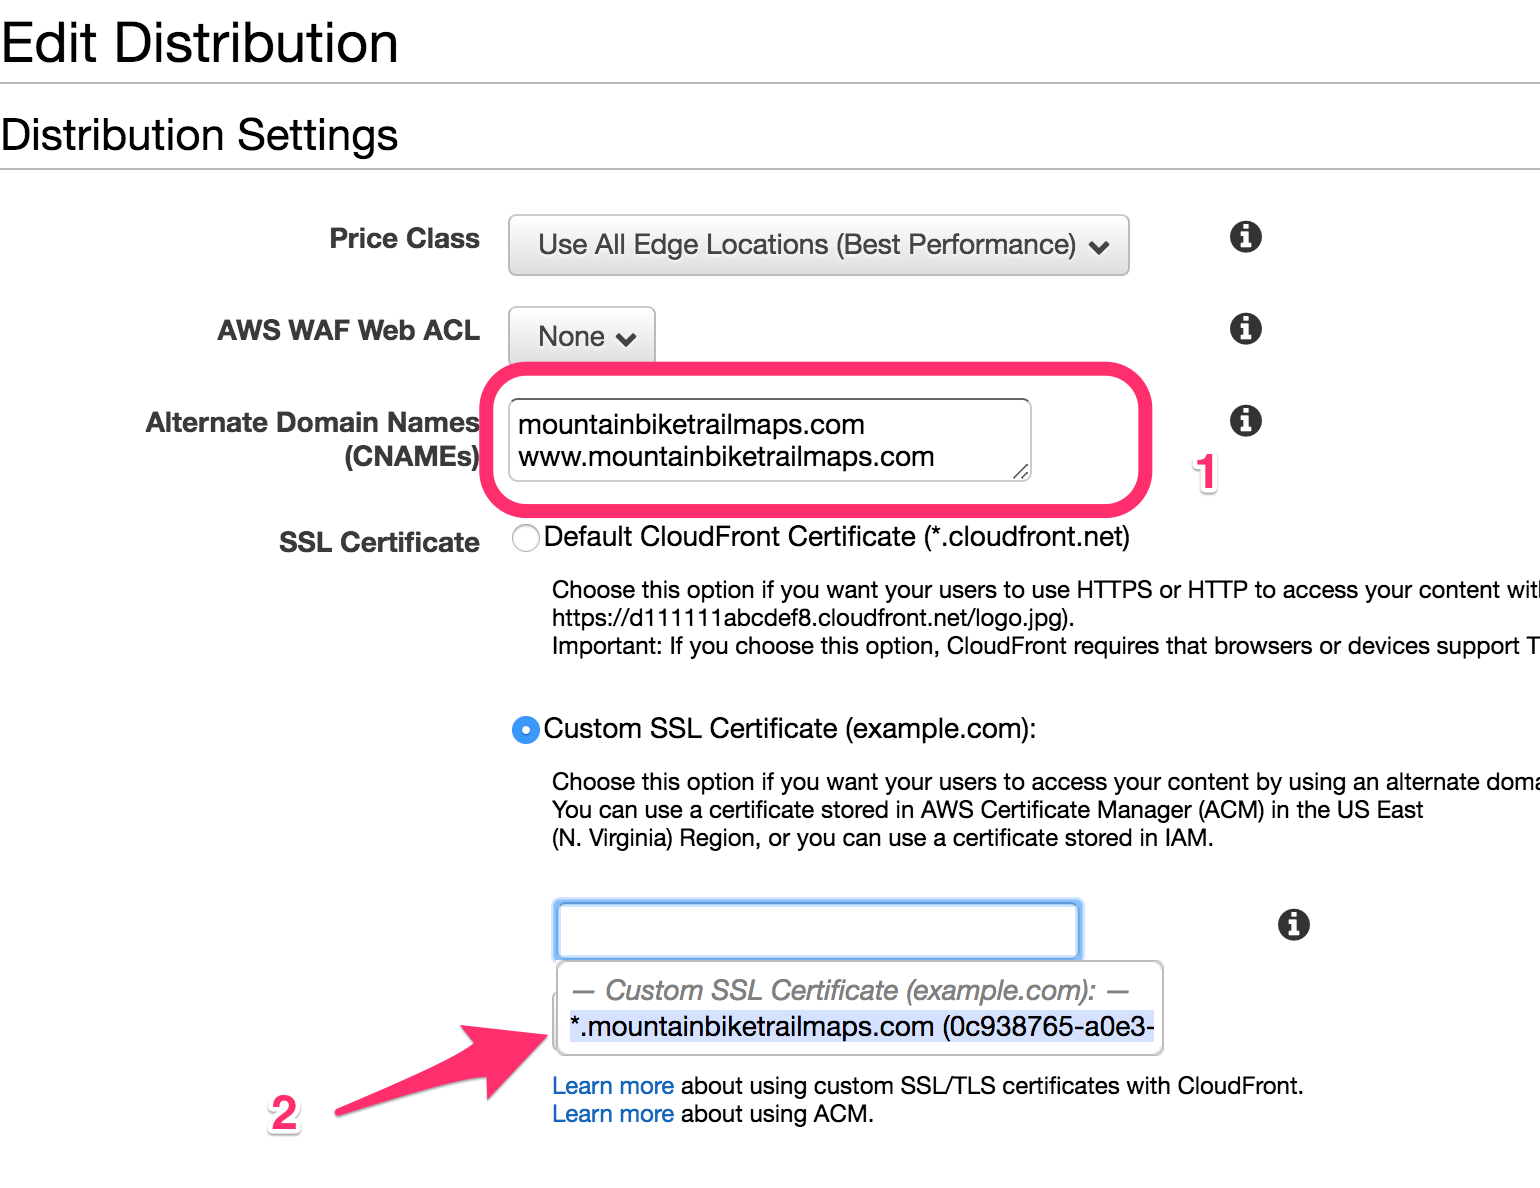
Click “Create Distribution” at the bottom of the page. You should be returned to the CloudFront Distribution list page and your new distribution should have appeared. Click the ID of the distribution. Then click “Edit”. On this page, we will need to enter the alternate domain names.
 The process for creating the CloudFront Distribution will take some time. When the distribution setup is complete, it’s a good idea to test the CloudFront URL (https://d3ja8if6knf4kr.cloudfront.net in my case).
Now that CloudFront has been setup, we need to do one last thing in Route 53. We need to modify our “A” records (IPv4 address) to our CloudFront URL.

And, finally, this is it! Our static site should now be all setup. We’ve added a bucket, filling it with static assets. Then we setup our custom domain, along with SSL and a CloudFront distribution.
Posted in aws